
Play12 Manual
Contents
Introduction
All music is made up of notes. Notes are defined by their pitch — which key to press, their duration — how long to hold it, and their loudness — how strongly to press it. They are also arranged in a specific order over time. In other words, playing music means pressing, holding, and releasing the right keys at the right time and with the right amount of force.
In Play12, notes are represented by the symbols 0, 1, 2, 3, 4, 5, 6, 7, 8, 9, X, Y and by rainbow colors. The notation is designed so that you can immediately see which key to press, how long to hold it, and when to play it.
Sounds easy? Don't be fooled. In practice, it takes time for your movements to become accurate and confident. Every lesson happens at the piano. Every repetition improves your playing skill, and results appear faster because you are making music from the very beginning. Play12 is for people who want to learn piano by playing piano.
The Play12 learning material is divided into two parts:
Manual — explains the rules of playing.
Practice — a collection of exercises for building playing skills.
They are connected through a shared chapter structure: each chapter in Play12 Practice corresponds to a chapter in the Play12 Manual.
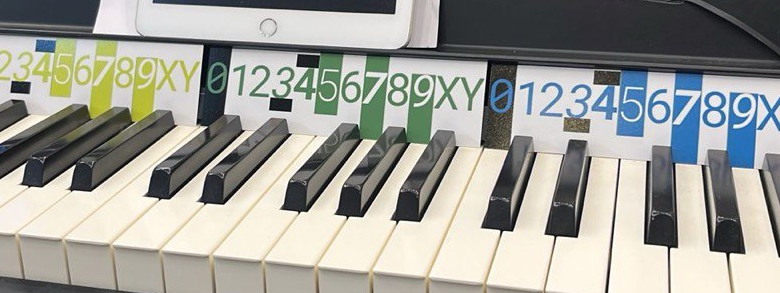
At the beginning, you will need the cards. They help you quickly locate the correct keys. Below you will find a link to the cards and instructions on how to prepare them before you begin.
The material is arranged in sequence: each Block builds on the previous one. Some things may seem obvious. You can read the text quickly or slowly, return to specific sections, and review them whenever needed.
First, read Block 1 of the Play12 Manual to get a general understanding of the system. Then move on to Block 1 of Play12 Practice. During your training, return to the relevant sections of the Manual and review the material as needed. Then continue with Block 2 of the Play12 Manual and Block 2 of Play12 Practice, and so on.
And yes — read the Play12 Manual at your instrument.
Let's play.
Block 1. Getting Started
Chapter 1. There Are Only 12 Notes in Music
Here's a Little Trick. Choose any key and place the little finger of your left hand on it. Using that key as the first one, count 12 keys to the right and place the little finger of your right hand on the twelfth key. Between your two little fingers, you will find 7 white keys and 5 black keys.
Did you guess correctly? If not, check that you counted properly. Now choose a different key, count 12 again and... 7 white keys and 5 black keys. The same result.
Now I'll reveal the main secret right away: There are only 12 notes in music. And the piano is one of the easiest places to see it. A piano is a keyboard instrument. Its keyboard is made up of white and black keys arranged in a specific pattern. Each key represents a note. Try your instrument. Press some keys. Feel how they respond under your fingers. Don't be afraid to experiment. Play single keys, several keys together, use either hand, play in any order you like. Take a close look at the keyboard.
There are many keys, but they are organized into repeating groups. Look at the black keys. Do you see the pattern? They are arranged in groups of two and three, and this pattern repeats across the entire keyboard. Every group of 12 consecutive keys contains 7 white keys and 5 black keys.
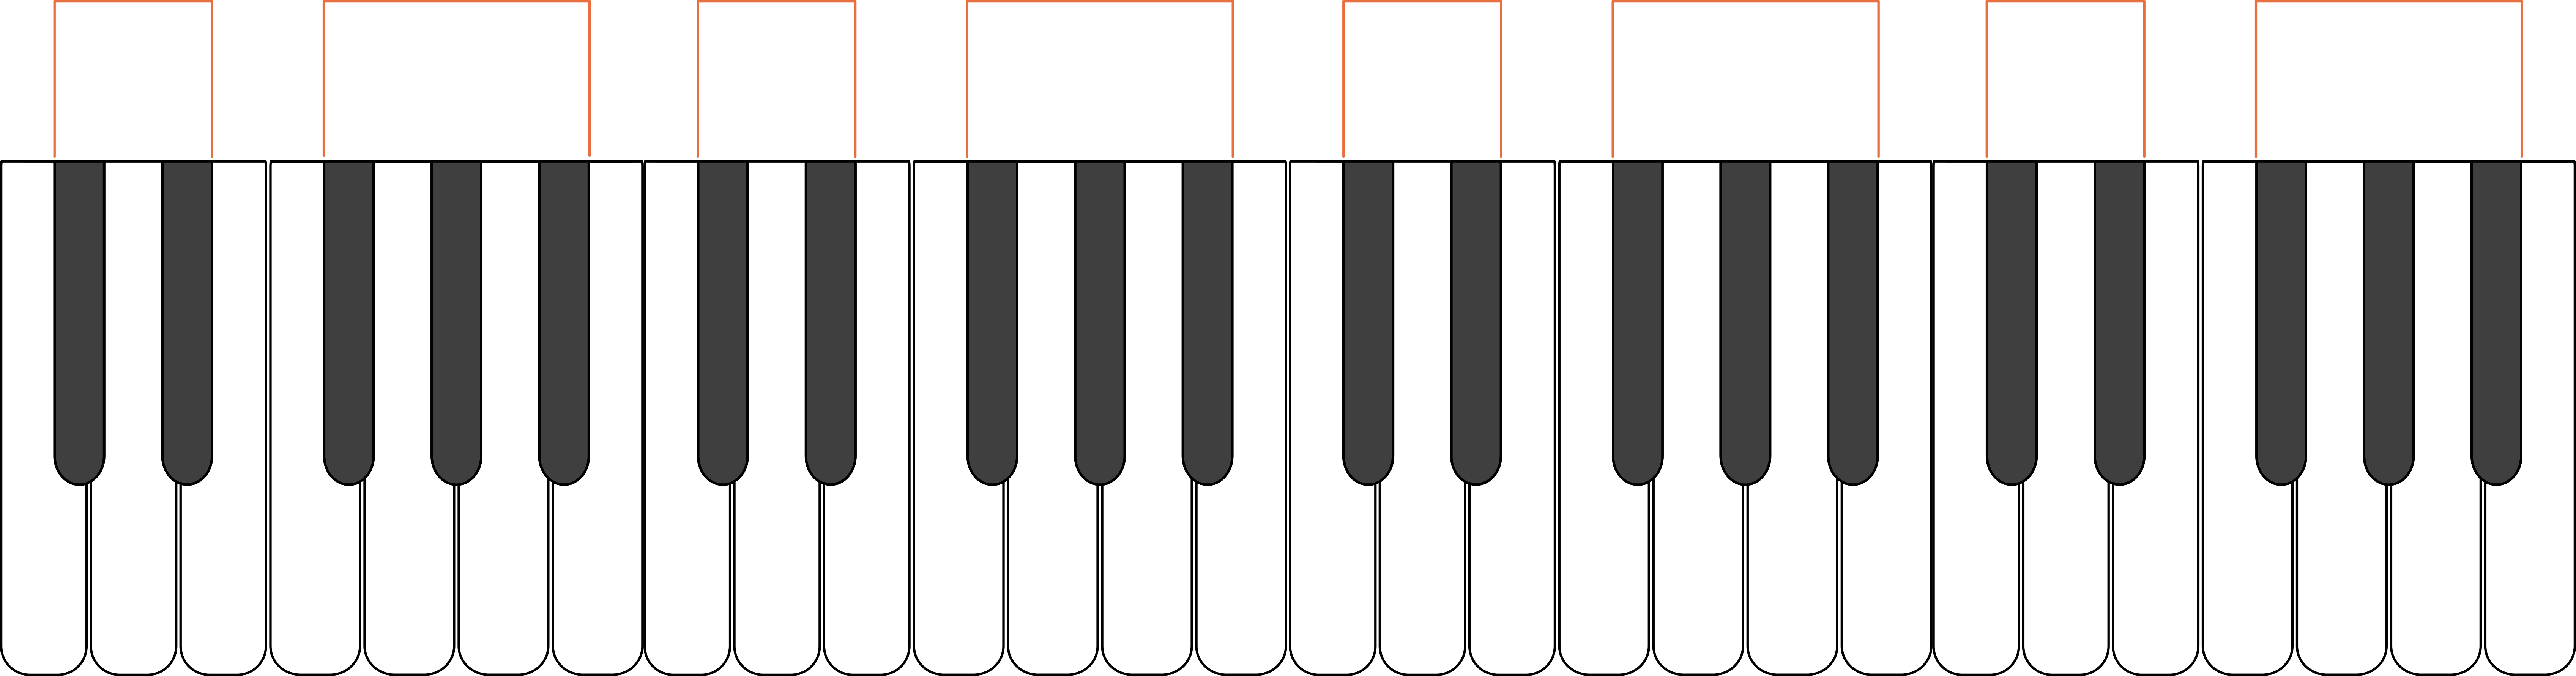
Before it and after it, you will find exactly the same pattern again, with the same arrangement of white and black keys. We will call this repeating group a Cycle.
You do not need to learn note names. In Play12, we work with the Cycle. You only need to count from zero to eleven. Each key in the Cycle has its own symbol. The symbols are arranged in order from 0 to Y:
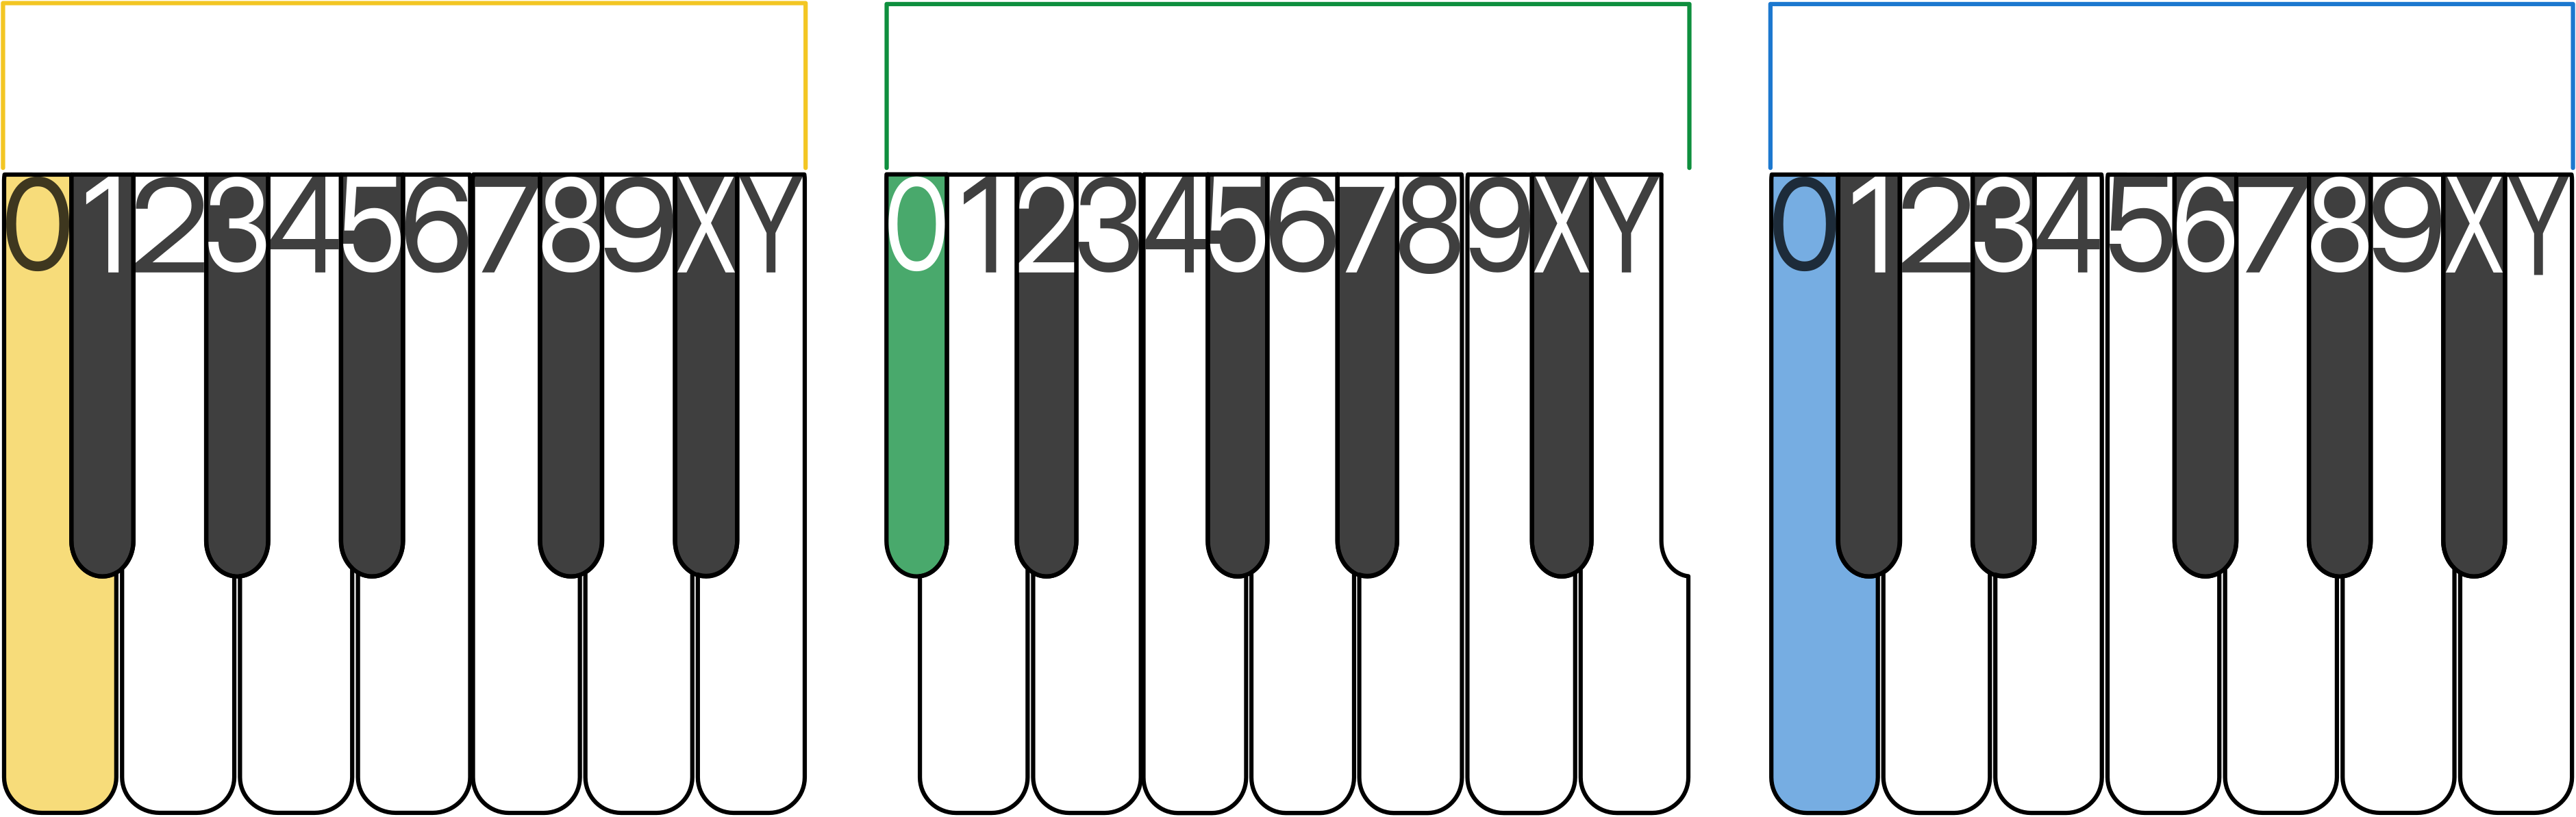
I do not use the numbers 10 and 11 because they can be easily confused when reading quickly. 10 can be mistaken for 1 and 0. 11 can be mistaken for 1 and 1. That is why I use X instead of 10 and Y instead of 11. After Y, the sequence starts again from 0. This is simply a way of identifying which key we are talking about.
Once you understand that there are only 12 notes and that they repeat continuously, the keyboard stops feeling chaotic. It becomes predictable. And when something becomes predictable, it becomes easier to play.

But a natural question appears:
Where should the counting begin?
Chapter 2. You Decide Which Key Is 0
It's time to play your first melody.
Take any Cycle card marked from 0 to Y and place it somewhere in the middle of the keyboard where both hands can play comfortably. The 0 on your card is marked in black. You can place it above any key.
Great.
Now place the index finger of your left hand (I) on key 0 and your thumb (T) on key 1. Position the fingers of your right hand like this: Index finger (I) — 4, Middle finger (M) — 5, Ring finger (R) — 7.
You are about to play the main theme of When the Saints Go Marching In. Press the keys in the following order and try to make the first three notes the same length. Let note 7 ring a little longer.

Try it. Play it a few times. Let the melody become louder and more confident. Don't worry if it doesn't work perfectly right away. With every practice session, it will get better. Once you feel comfortable, move the Cycle card 7 keys to the right.
Now play the same melody again.
When you can play it without mistakes, move the Cycle one more key to the right. Play with this new 0 for a while. Now play the melody using only your right hand. Use your little finger for note 7.

And one more variation. Move the Cycle 5 keys to the left. You already know what to do. This time, play it with your left hand only.

0 is your home note. It is the starting point of a melody.
0 is often the note where music begins and the note it wants to return to.
And most importantly:
0 is the note you choose. You can change it whenever you want.
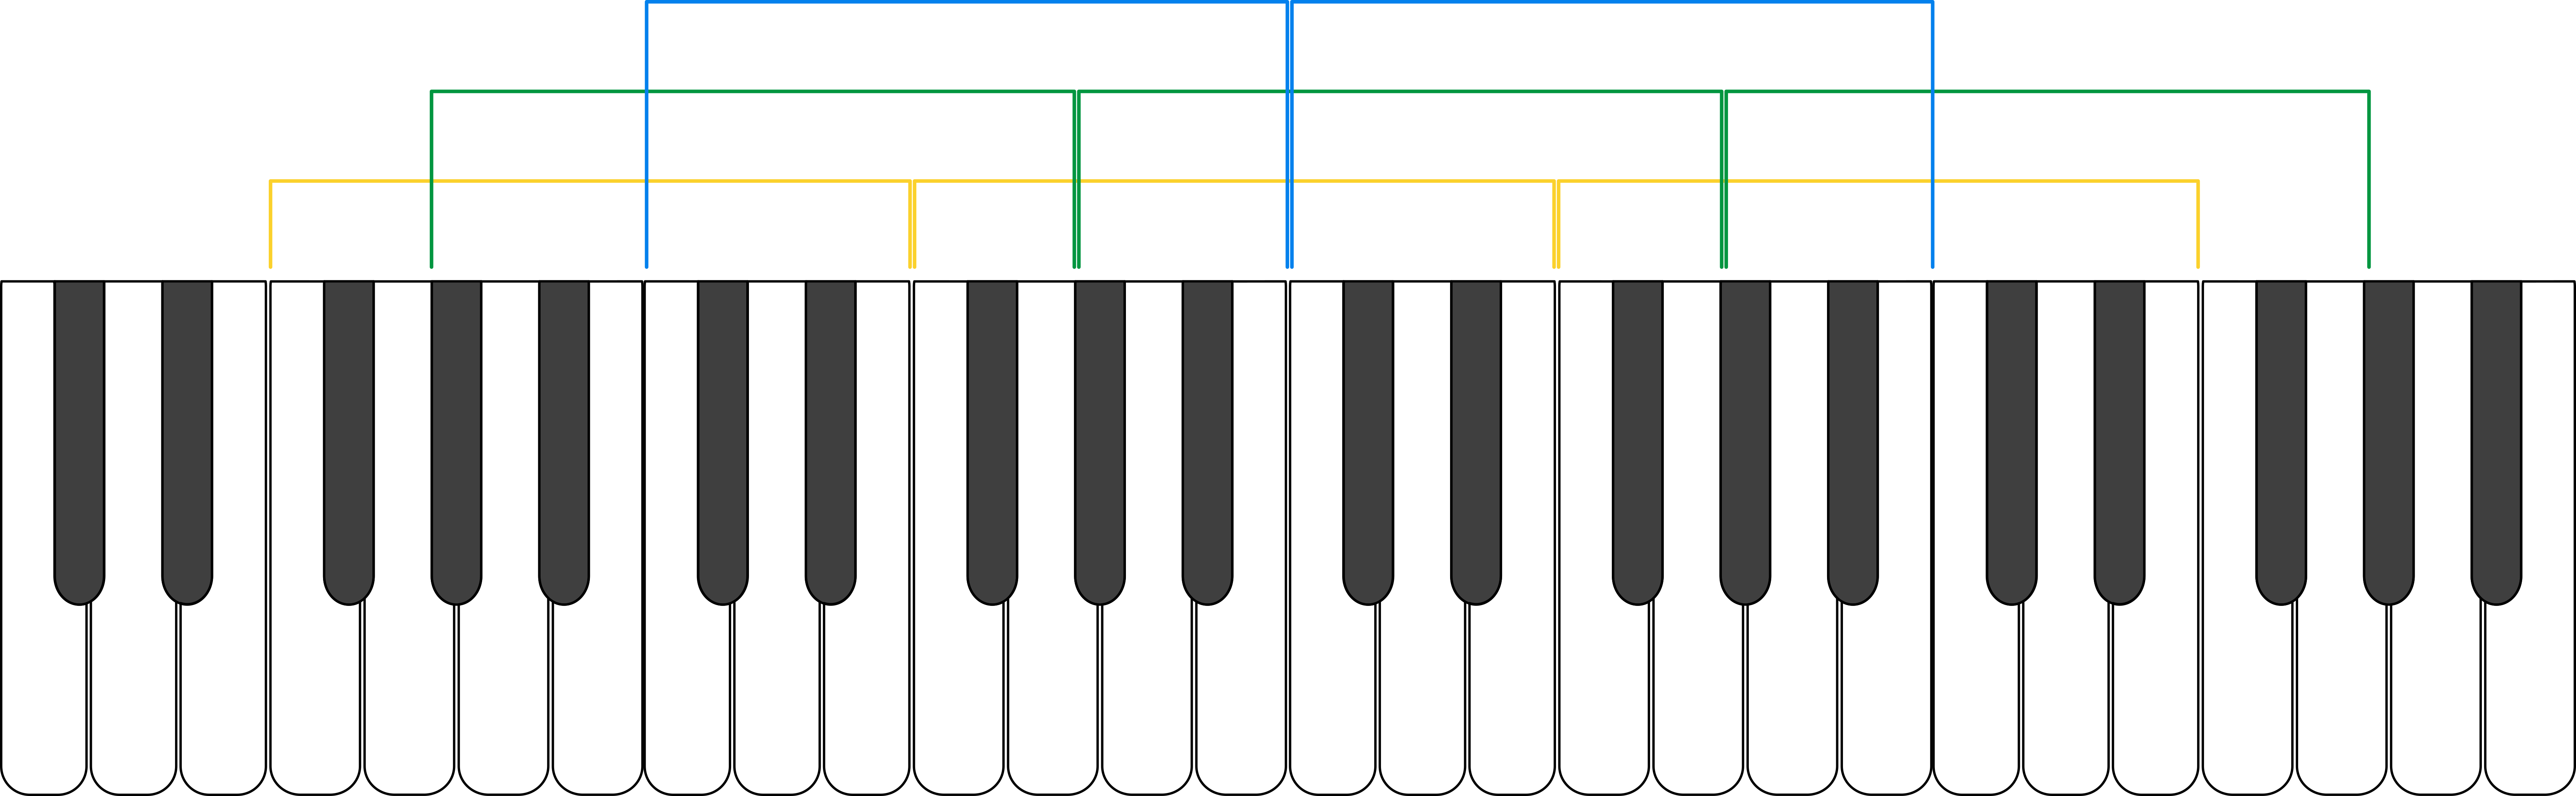
Choose any key within the first 12 keys of the keyboard. Place the card so that the symbol 0 sits above that key. If your instrument has more than 61 keys, start with the red Cycle. If it has 61 keys or fewer, start with the orange Cycle. Then place the remaining cards in rainbow order, one after another, for as long as they fit on the keyboard.
Once 0 is known, every key can be identified by a color and a symbol. And you immediately know which key you are looking at. Now it's time to learn how long a key should be held and when it should be released.
Chapter 3. Block Length = Note Duration
Turn on some music you enjoy. Stand up and move with the rhythm. Dancing makes this easier to do naturally. Add claps. Now sit down at your instrument. Keep clapping and count out loud:
ONE, TWO, THREE, FOUR
Now clap your left hand on your leg without the music. Read the count from bottom to top. One clap equals one count.
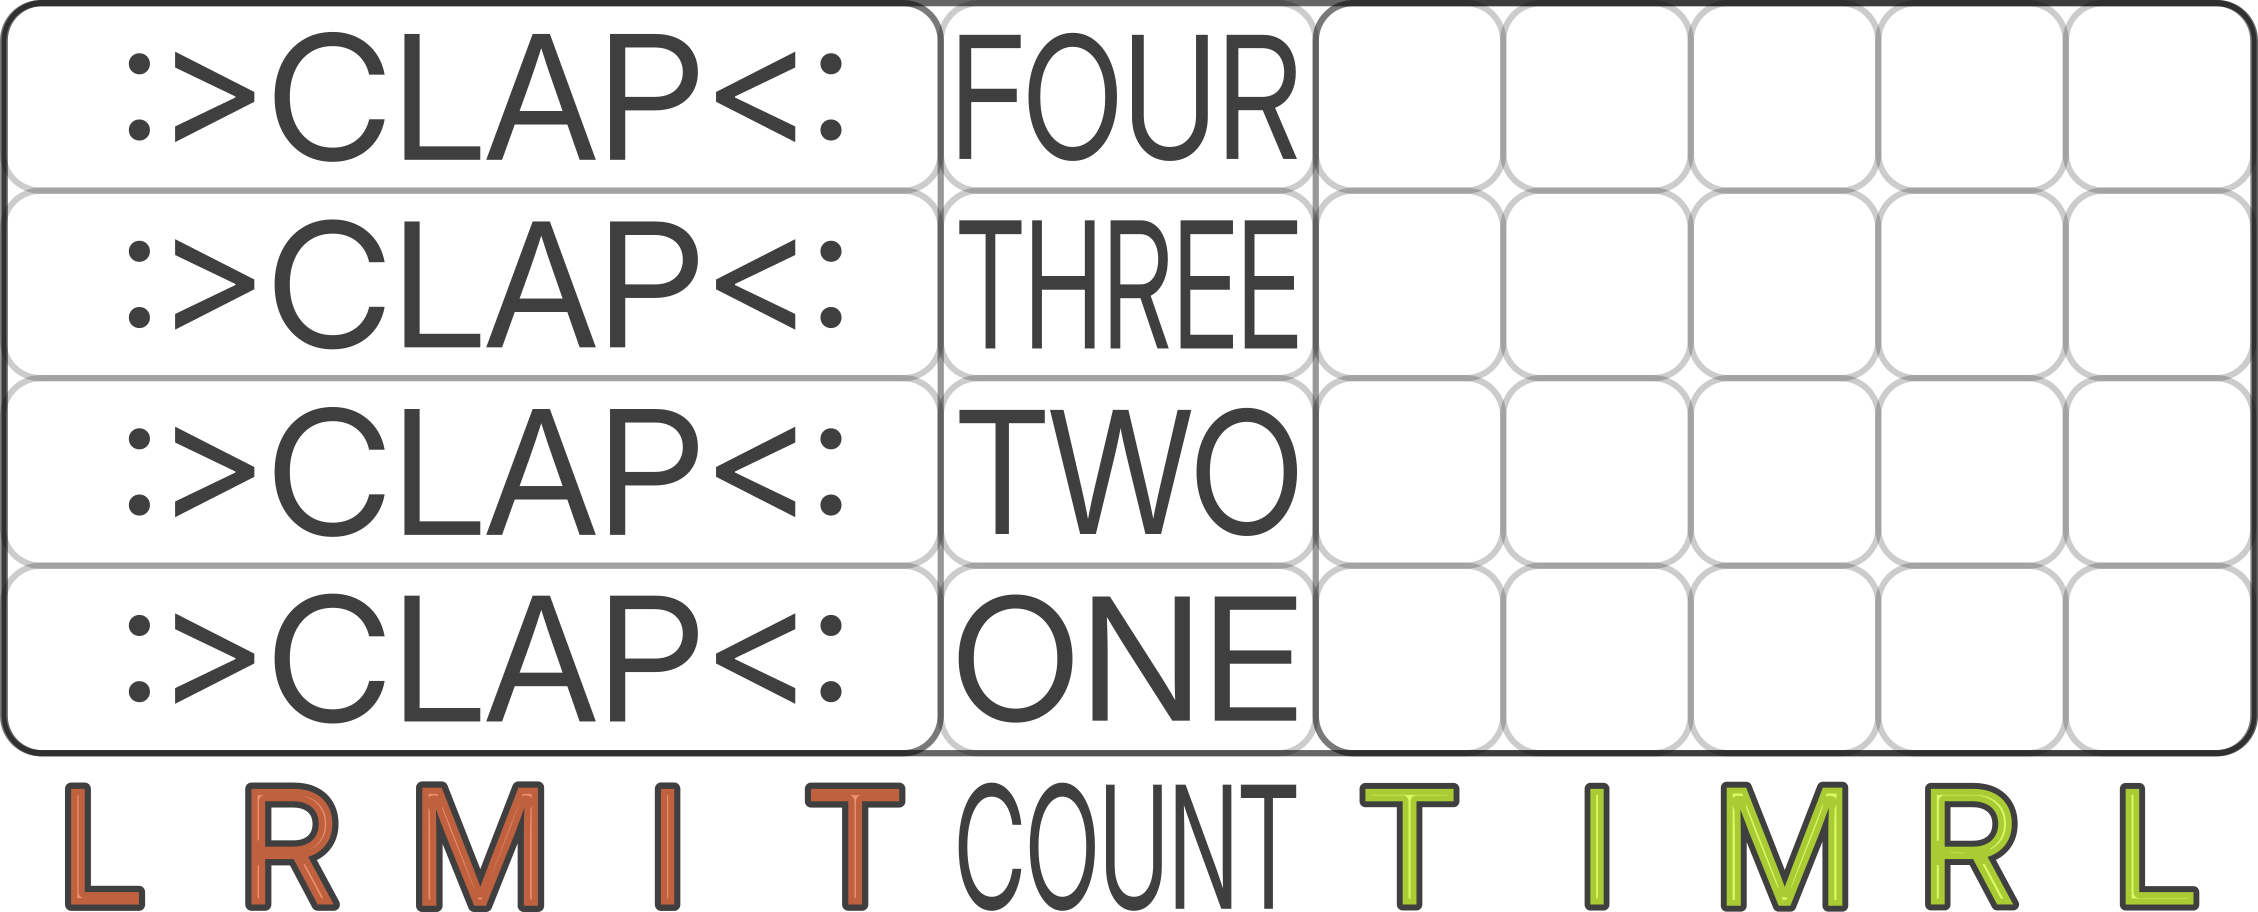
Keep counting out loud. With every clap of your left hand, press any key with the middle finger of your right hand.
You are playing notes that last for one Step. In Play12, a Step is the smallest unit of time. It corresponds to the shortest note or rest used in a piece of music.
Switch hands.
Your right hand now keeps the Count with claps.
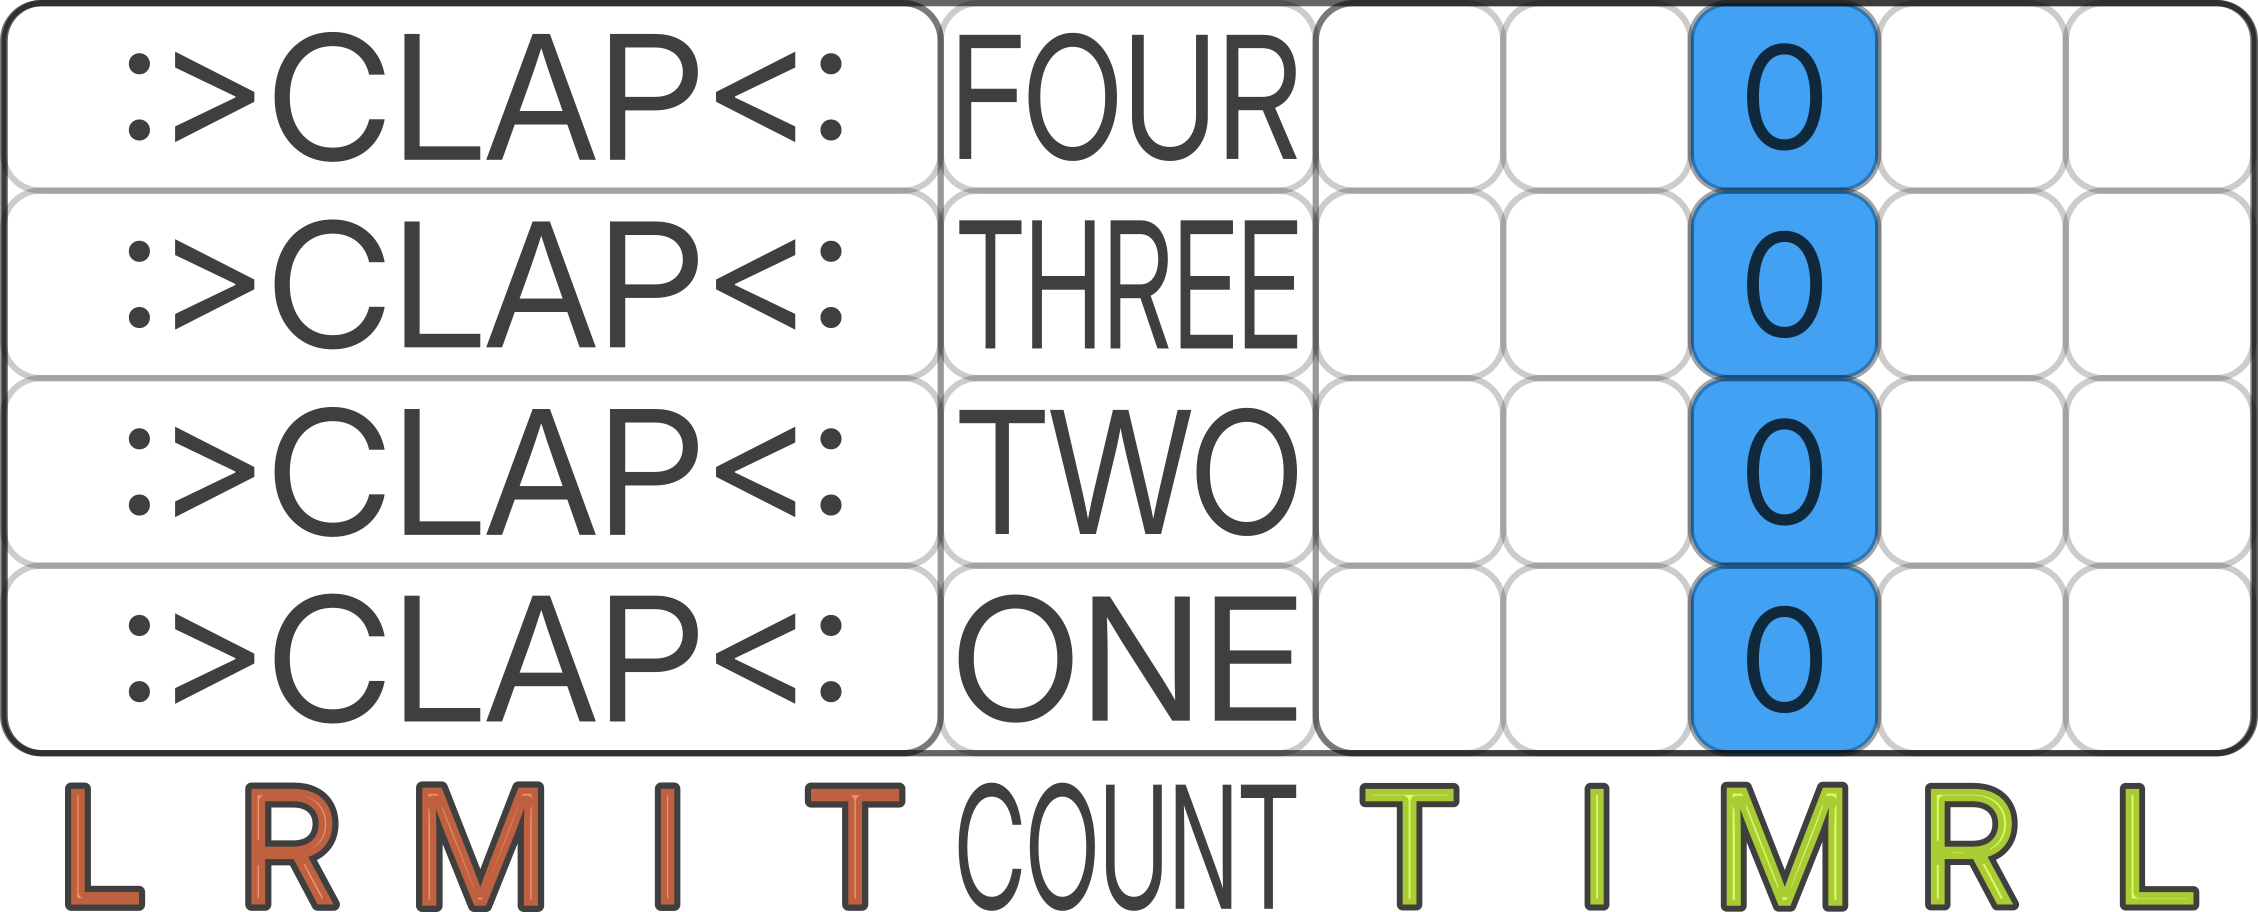
This time, play a note that lasts for two Steps:
press on ONE
hold through TWO
release before THREE
press on THREE
hold through FOUR
release before ONE
Repeat 12 times until the movement becomes automatic.

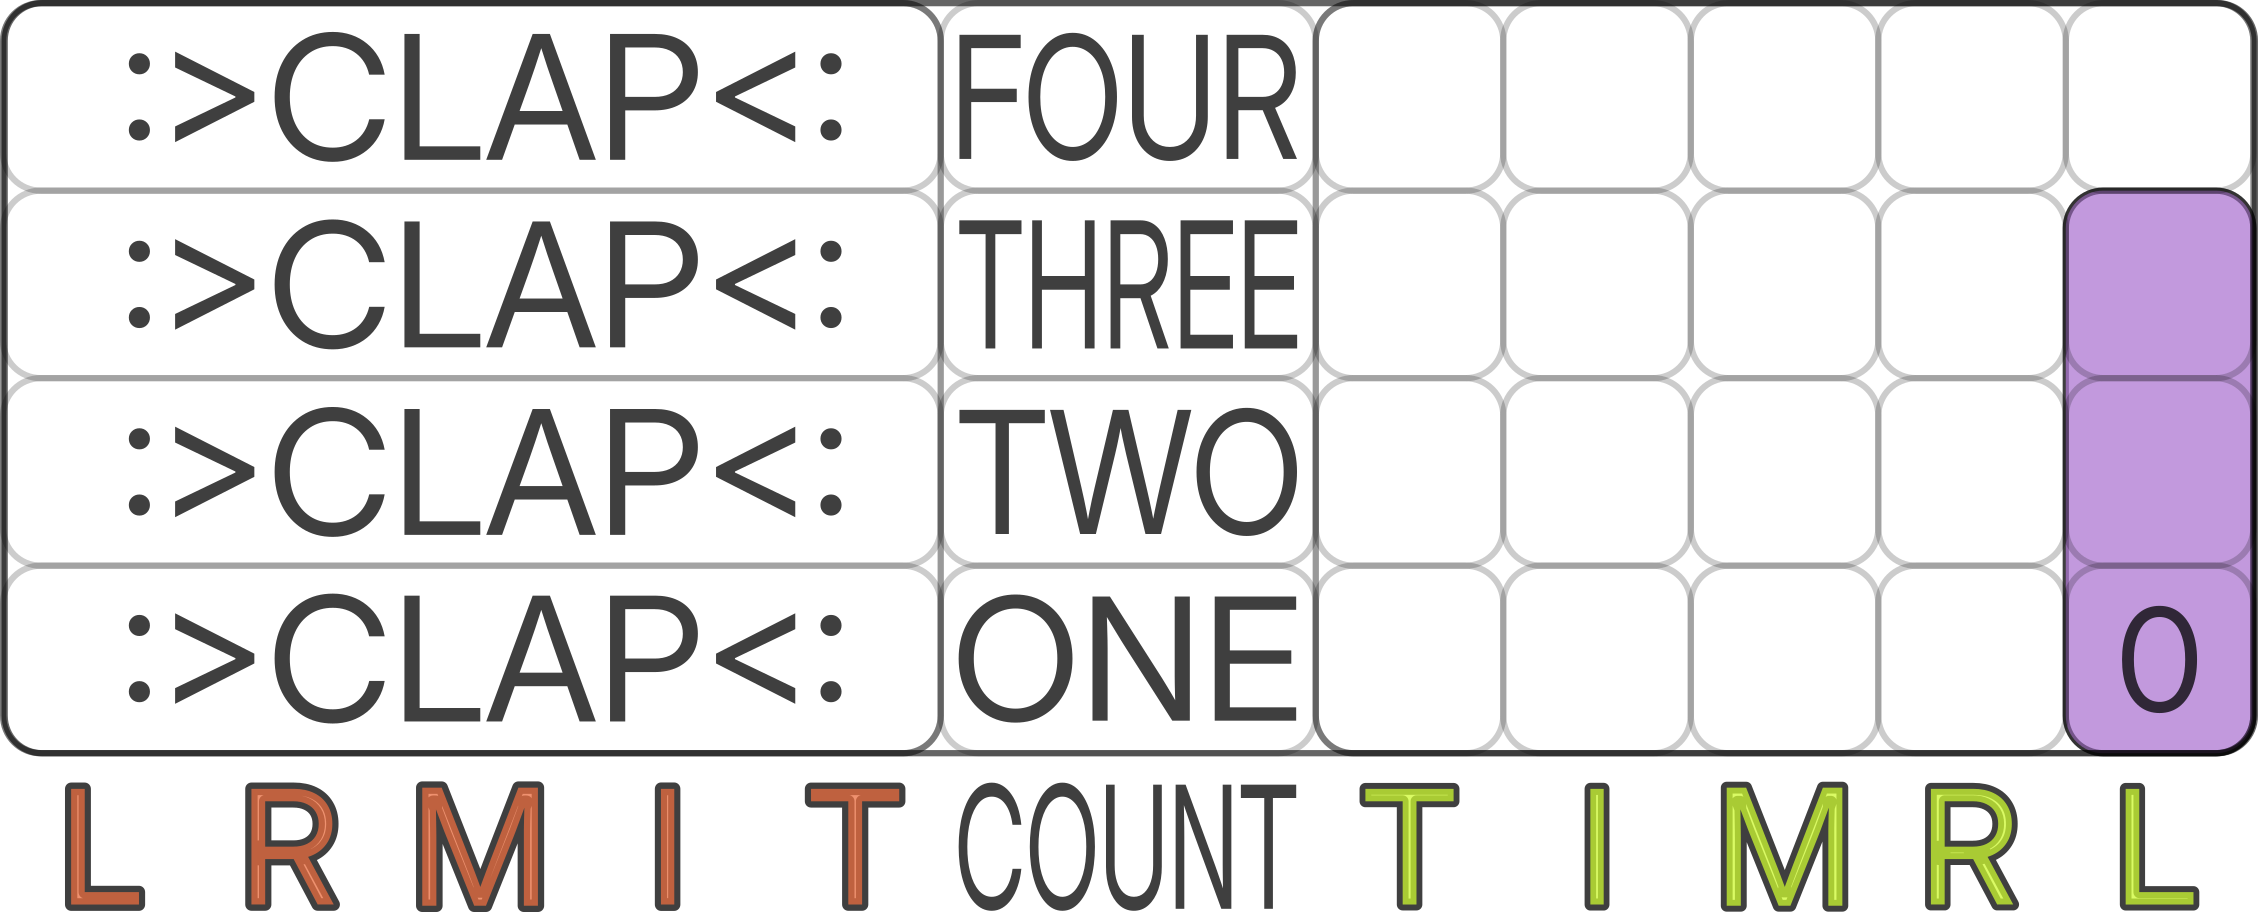
Switch hands again.
Now play a note that lasts for three Steps:
press on ONE
hold through TWO
hold through THREE
release before FOUR
Repeat 12 times.
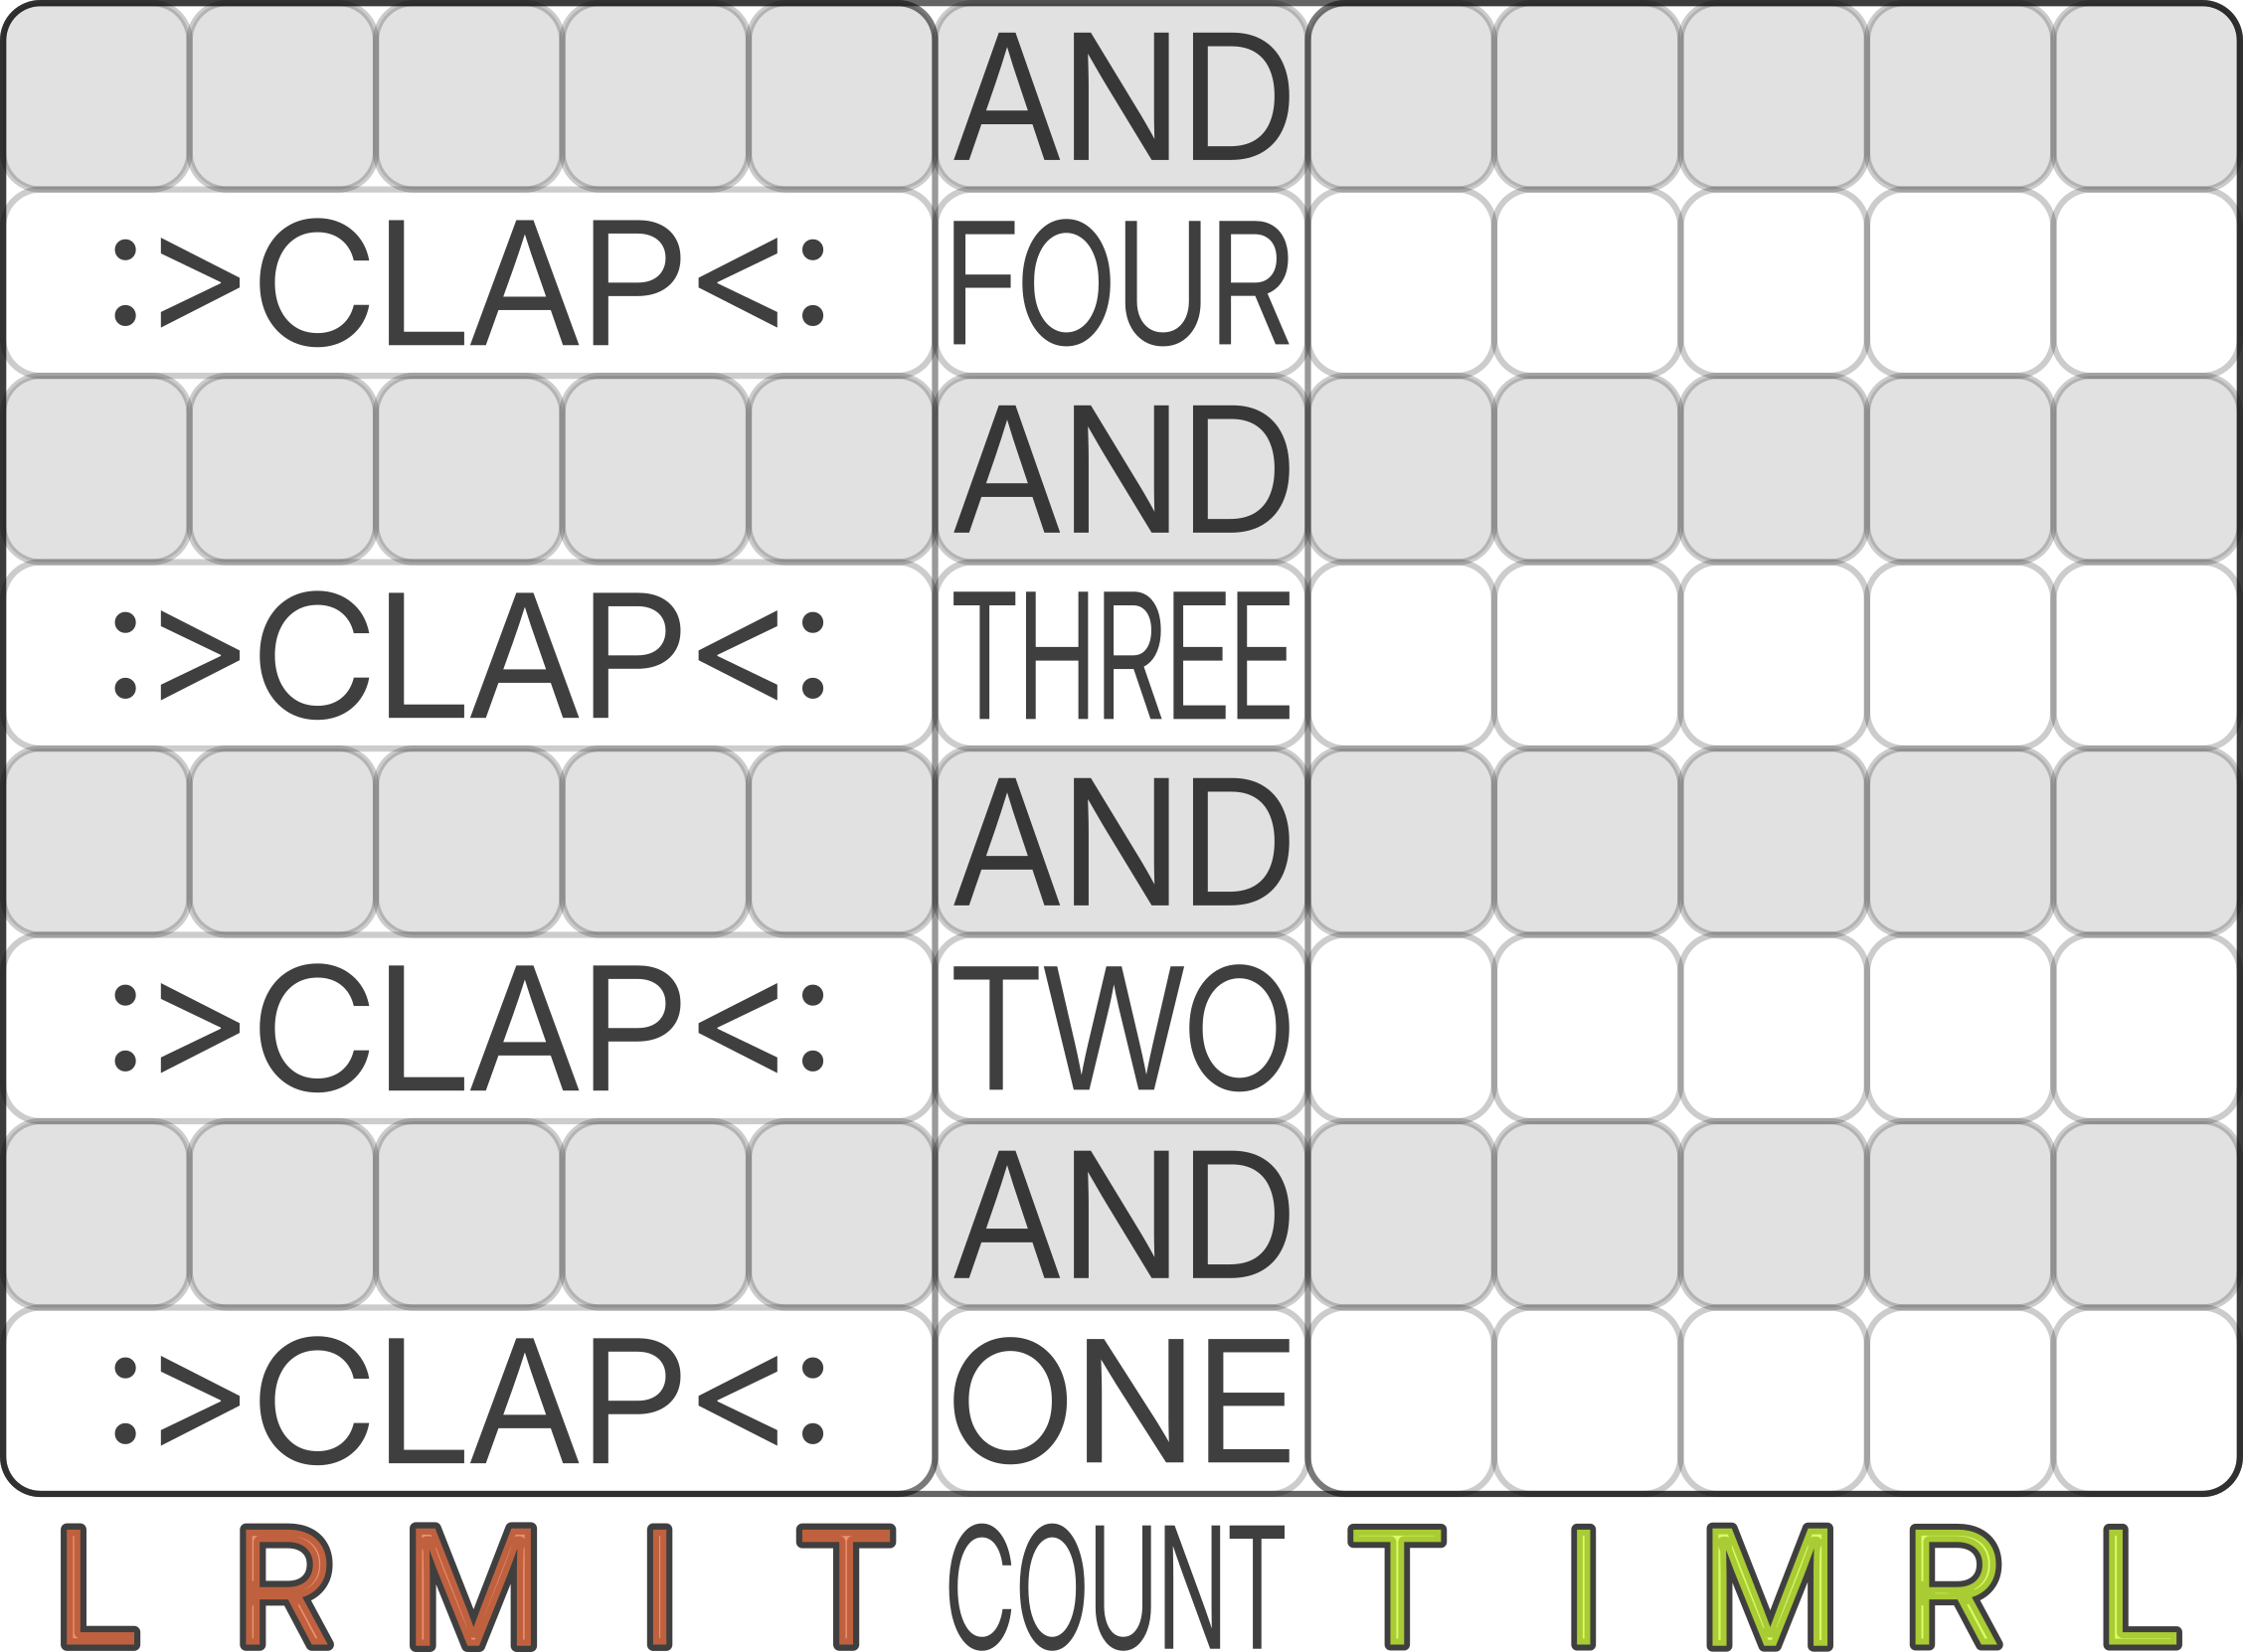
A single row in the notation field represents one Step.

Sometimes a Count contains more than one Step. When that happens, say AND between the numbers:
Try playing a melody. Place the Cycle card in a comfortable position. Position the fingers of your right hand above these keys:
(T) Thumb — 0
(I) Index — 2
(M) Middle — 4
(R) Ring — 5
(L) Little — 7
Set a comfortable tempo by clapping with your left hand. Now play:
A Count can have different lengths:
ONE, TWO
ONE, TWO, THREE
ONE, TWO, THREE, FOUR
ONE, TWO, THREE, FOUR, FIVE
ONE, TWO, THREE, FOUR, FIVE, SIX (Count out loud and clap only on ONE.)
A group of Steps from one ONE to the next ONE is called a Round. Rounds can have different lengths depending on the Count:
ONE, TWO
ONE, TWO, THREE
ONE, TWO, THREE, FOUR
Music always moves in Steps. Count them. Then you will always know which keys to press, when to press them, and how long to hold them.
Next, let's learn how to write and read them.
Chapter 4. Reading and Writing Notes in Play12
This is what When the Saints Go Marching In looks like when written in a Play12 notation field:
Notes are written as Blocks. There is a field for the left hand and a field for the right hand. Each field is divided:
vertically into columns (fingers)
horizontally into Steps
We count and read notes from bottom to top. A Step is the smallest unit of time. A group of Steps from one ONE to the next ONE is called a Round. Every new ONE marks the beginning of a new Round.
A Block has three properties:
1. Color and symbol (0–Y) — which key to press
2. Position — when to play it and which finger to use
3. Length — how long to hold it
If multiple Blocks appear in the same Step, press them at the same time. If a Step contains no Block, play nothing. That is a rest.
How to Read the Notation
This is the central Play12 algorithm.
1. Read from bottom to top.
2. Move Step by Step.
At each Step:
P — Find the Blocks
L — Look at the colors and symbols
A — Press the correct keys
Y — Hold them for the length of the Blocks
Then move to the next Step. If a Block is long, keep holding the key until the Block ends. If new Blocks appear, add them without releasing the previous ones.
Congratulations.
You have completed the first Block. You already know enough to play your favorite music in Play12 and continue developing your piano skills.
The following chapters will show you how music is built, introduce the principles of improvisation, and explain how rhythm affects sound.
Before moving on to Block 2, complete the practical exercises in Block 1 Practice.
Block 2. Note Combinations
Introduction
Congratulations! You have completed Block 1.
If something does not work out, go back to Block 1 and work through it again. It is the foundation on which all the following chapters are built.
If you already know all 12 notes, can count them from any 0, find your way around the keyboard, understand note duration, and read Play12 notation, then you have done more than just spend your whole life wanting to learn piano.
You are already playing.
The next part will be more challenging, and that is completely normal.
You will no longer just press individual keys — you will combine them into patterns. Little by little, you will begin to understand why different groups of notes create different sounds and how music is built from them.
Sometimes you will need to stop, slow down, and work through the material step by step, repeating it many times until the skill settles into your hands.
That is the process.
The more you practice, the better the result.
Now it gets more interesting.
Yes, all music is made of notes. Notes can sound one at a time, flow from one to another, or sound together — in pairs, in groups of three, or sometimes in larger groups called chords.
In this Block, you will learn what creates the difference between these combinations and how to use them in your playing.
Chapter 5. Distances Between Notes
Task:
Place a Cycle card in a comfortable position on the keyboard. Play the melody
When the Saints Go Marching In.

Without moving the card, play the same melody again, but shift each note +2 keys to the right,

and then +1 key further to the right.

Play all three variations slowly and carefully. Listen closely.
What changed? What stayed the same?
The melody remains the same.
Question:
What stays constant in these four notes (0–4–5–7 or 3–7–8–X) that makes us hear
the same melody?
Answer:
The Distances between notes.

A Distance is the number of keys from the starting key to the ending key, not counting the starting key.

Examples:
Distance from key 0 to key 5 → 5
Distance from key 3 to key X → 7
Distance from key 6 to key 9 → 3
A note by itself marks a single point of sound. Musical meaning emerges when you move from one note to another or when multiple notes sound simultaneously.
Distance has direction and character. It creates the flow of a melody and differs in tension and stability. Alternating and combining Distances defines the musical idea and mood.
There are 12 Distances in total, represented by symbols with an underscore:
1, 2, 3, 4, 5, 6, 7, 8, 9, X, Y, 0
Distances vary by length:
Short Distances: 1, 2, 3, 4, 5
6 — boundary, middle of the Cycle
Long Distances: 7, 8, 9, X, Y
Distances also have direction:
ascending — counted to the right from the starting key
descending — counted to the left
Recognizing Distances is a key skill. It helps you analyze music and improvise. If you give each Distance a mental association, recognizing them becomes much easier.
Fill out the association table for all Distances in Play12 Practice.
With experience, recognizing Distances will become effortless. You will start noticing them in familiar melodies and distinguishing them by ear. Over time, you will develop “favorite” Distances — those that appear often and are easiest to identify.
Most importantly, you will start to hear them not only individually, but also in combinations.
The next step is Chords.
Chapter 6. Chords
A chord is a combination of two or more Distances.
Simply watch:

These are the four chords from the video.

Play them. Try singing one of the songs. Look at them carefully and listen to how they sound.
Task:
One chord is different from the others. Which one is it, and why?
Hint:
Pay attention to the Distances.
Answer:
In the first, second, and fourth chords, the Distances from the first key are
4 and 7.
In the third chord, they are 3 and 7.
Play these chords one after another. Listen to the difference.
Think back to the difference between Distances 3 and 4 from Chapter 5. That single change is what alters the sound of the chord.
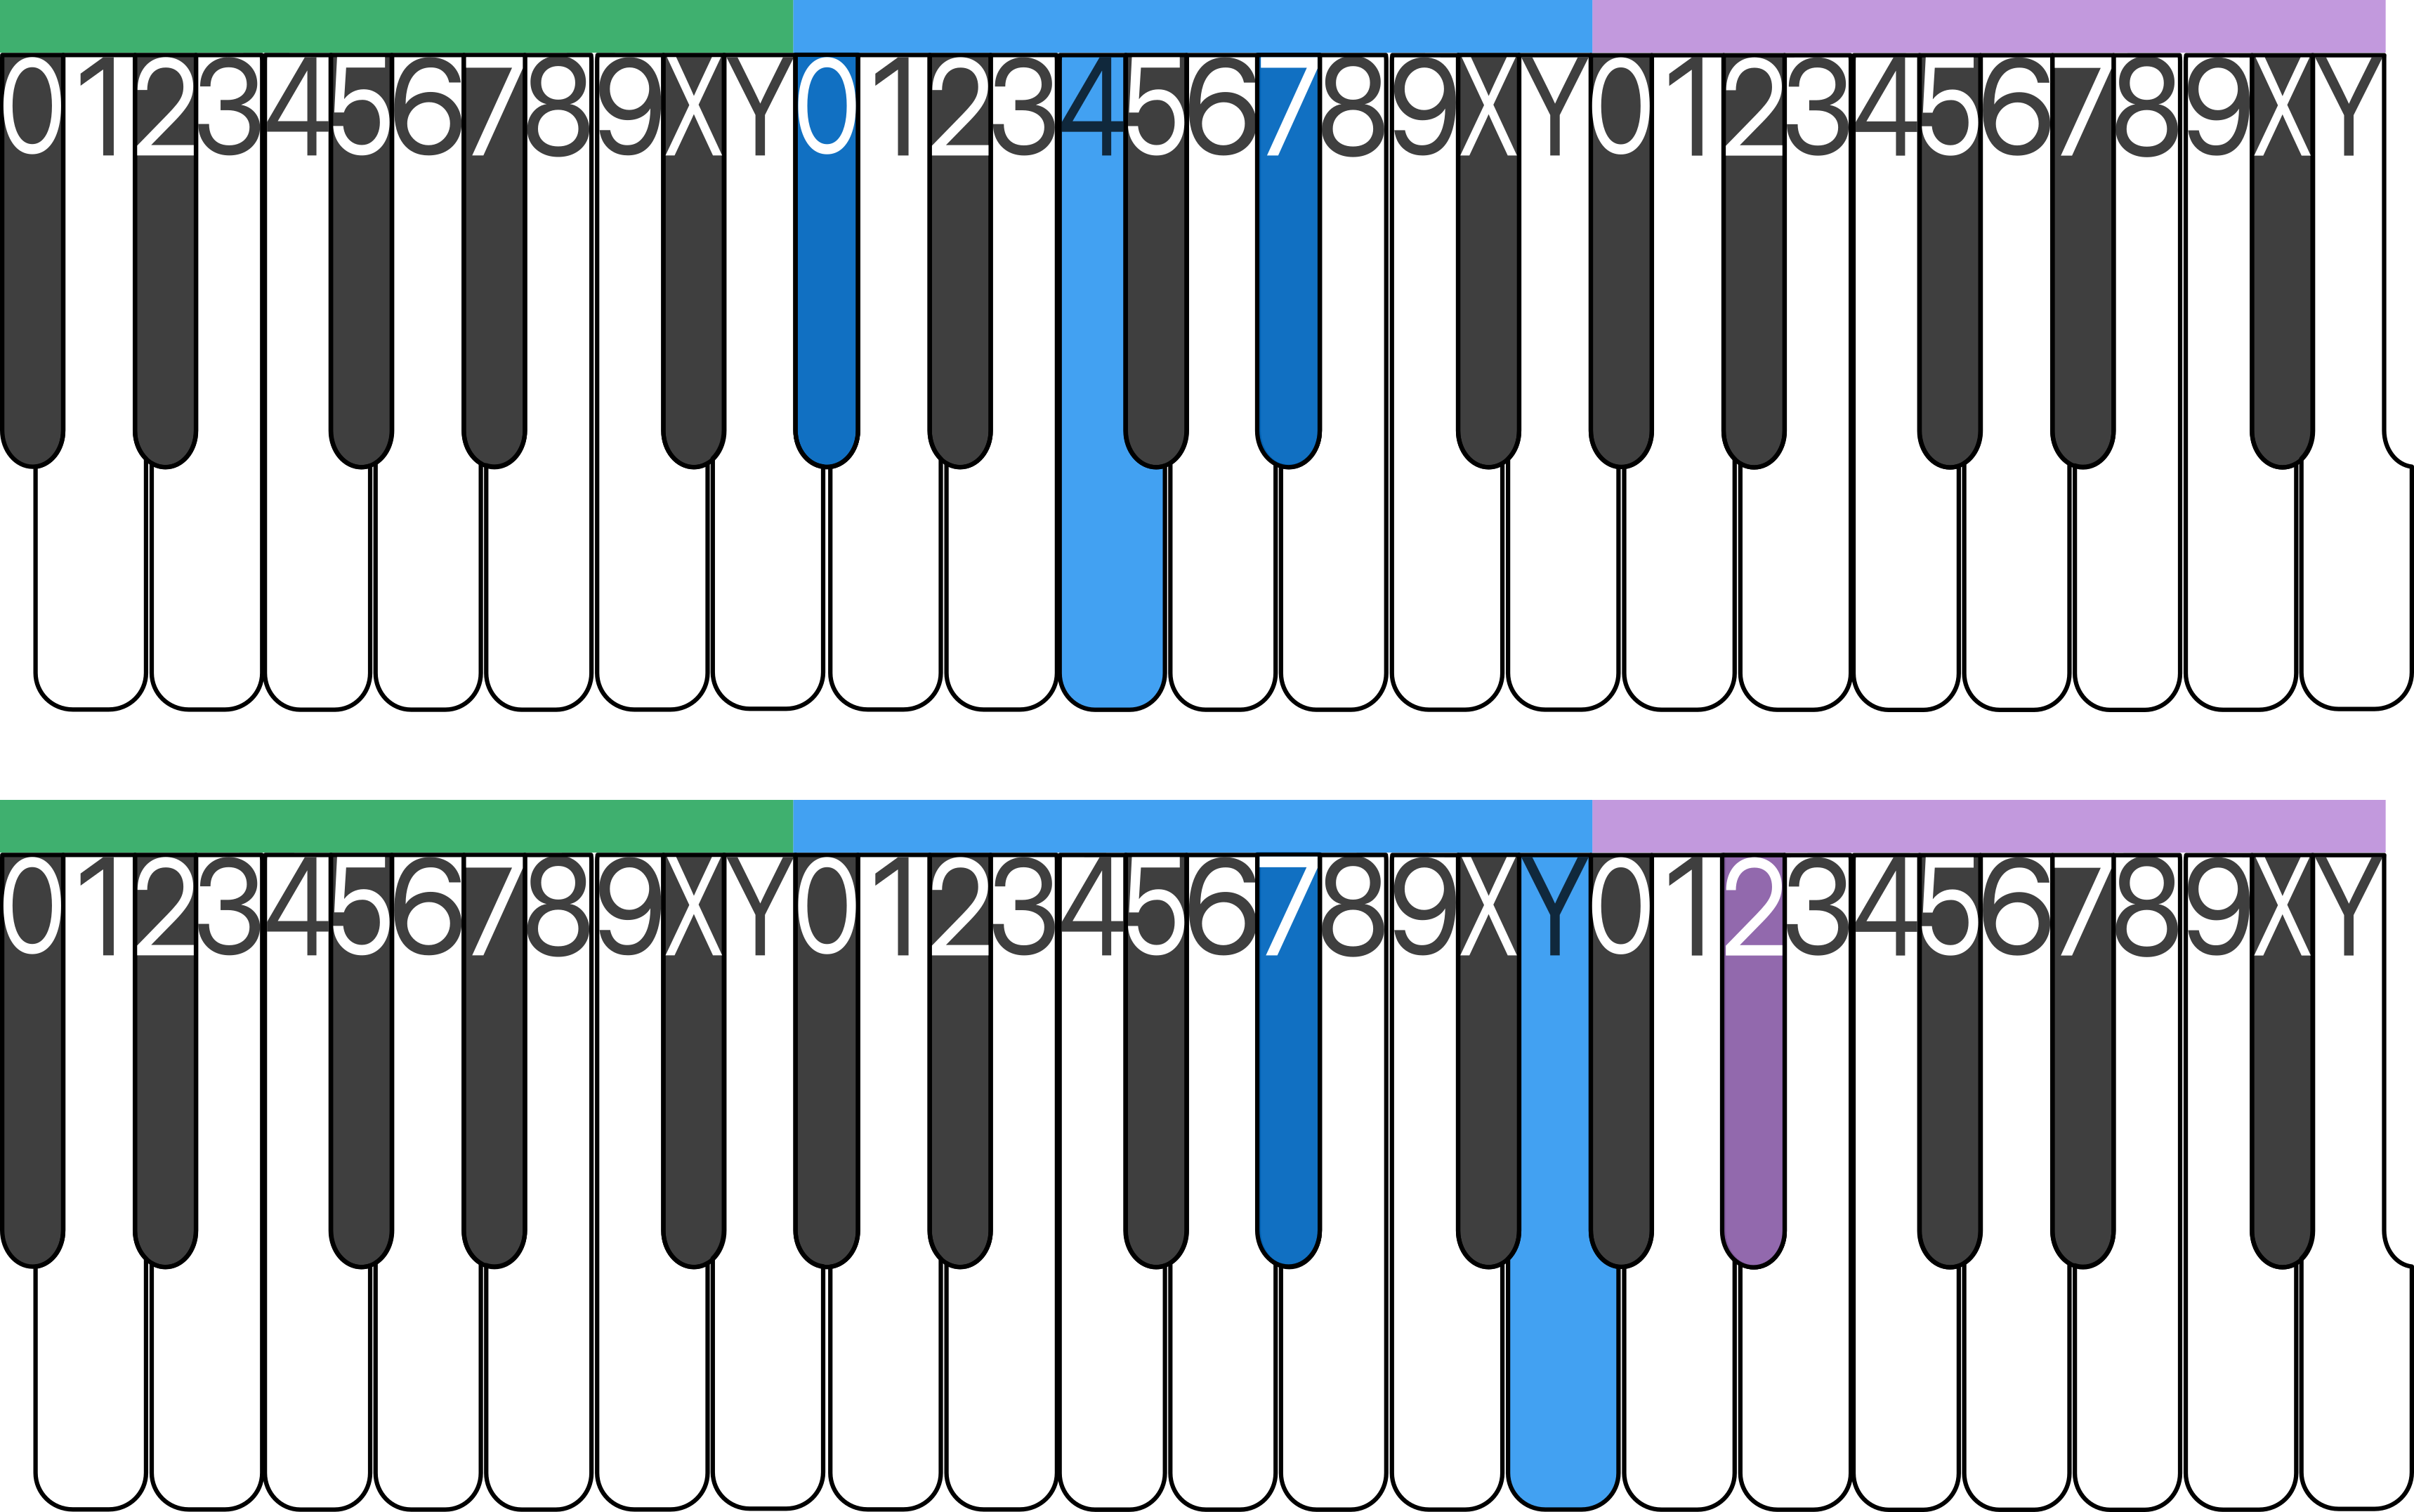
In music, there are two basic chord forms. In Play12, they are written like this:
[0]37 and [0]47
The key inside the square brackets is the Starting Key from which all Distances are measured.
Example:
[5]47
1. Find key [5]
2. Count 4 from it
3. Count 7 from it
4. Play all three keys together
Build [8]37 using the same principle.
The basic forms 37 and 47 can be built from any of the 12 notes. The Starting Key changes, but the structure remains the same.
Play these short progressions:
[0]47 → [7]47 → [5]47
[0]37 → [5]37 → [8]37
Count out loud and listen to how the sound changes.
Now play the chord progression from the video:
[0]47 → [7]47 → [9]37 → [5]47
When chords are played one after another, they create a musical foundation that can support a voice and become a song. Play the progression and try singing along. The melody is already familiar.
When the Saints go Marching
[0]47
O when the saints go marchin' in,
[0]47 [7]47
O when the saints go marchin' in,
[0]47 [0]479 [5]47 [5]479
Lord, I want to be in that number
[0]47 [7]479 [0]47
When the saints go marchin' in.
In Play12, chords can be written not only in the notation fields but also in a short form. This short form helps you read and play the accompaniment quickly.
To read and build chords freely, you need to understand how they are constructed. In Play12, a chord can be thought of as a building block.
Chapter 7. The Chord Builder in Play12
Building chords in Play12 is very simple. To build a chord, you need four elements:
Starting Key
Foundation
Inner Distance
Outer Distance
Each element affects the shape and sound of the chord. When an element changes or is added, the chord changes as well. You can hear it. Play and listen to these progressions. Pay attention to how the sound changes as elements are added or replaced.
[0]27 → [0]37 → [0]47 → [0]57
[0]479 → [0]47X → [0]47Y
Let's look at each element of the builder using the chord [5]479 as an example:

[5]479
[5] — Starting Key
4 — Inner Distance
7 — Foundation
9 — Outer Distance
Starting Key
This is the key from which all Distances are measured.
It is written as a key symbol inside square brackets.
Foundation
This is the Distance that, together with the Starting Key, forms the framework of the chord. Depending on the Foundation, chords can be narrow, standard, or wide.
6 — Narrow Foundation
7 — Standard Foundation
8 — Wide Foundation
Inner Distances
These are the shape-forming element. They are located between the Starting Key and the Foundation. Inner Distances determine the basic shape of the chord. If there are no Inner Distances, the basic shape does not exist.
3, 4 — basic shapes
2, 5 — additional variations
1, 6 — rare variations
Outer Distances
These are located outside the chord framework and add additional shades to the sound.
How to Read a Chord Code
When you see a chord code, break it down into its elements.
Example: [5]479
Step 1. Find the Starting Key
This is the key from which the chord is built. Key 5.
Step 2. Find the Foundation
Look for the Foundation in the code. It will be 7, 6, or 8.
If there is a 7, it is the Standard Foundation.
If there is no 7, look for 6 or 8.
In this chord:
7 — Foundation
5 + 7 = 0 → key 0
Step 3. Find the Inner Distances
Values smaller than the Foundation are Inner Distances.
In this chord:
4 — Inner Distance
5 + 4 = 9 → key 9
Step 4. Find the Outer Distances
Values larger than the Foundation are Outer Distances.
In this chord:
9 — Outer Distance
5 + 9 = 2 → key 2
As a result, for chord [5]479 you need the keys:
5, 0, 9, 2
Important!
The code shows which key the chord is built from and which Distances must be built.
When you calculate those Distances, you get the keys that make up the chord.
You can play the keys in any order:
5 0 9 2
0 9 2 5
9 2 5 0
2 5 0 9
These are all the same chord: [5]479
The code does not define the order of the keys.
We will look in detail at how to choose the order of keys in the next chapter.
Chapter 8. Key Order in Chords
Return to the first four chords from Chapter 6:
[0]47 → [7]47 → [9]37 → [5]47
Add the bass in your left hand. Play this sequence.

Focus on the sensations and notice:
what receives the main attention
which action requires the most concentration
what feels the most difficult
Now play the same chords again, but try changing the order of keys inside each chord.

Play it. Let your hand get used to it.
When you can play consecutively without stopping, ask yourself:
What has changed?
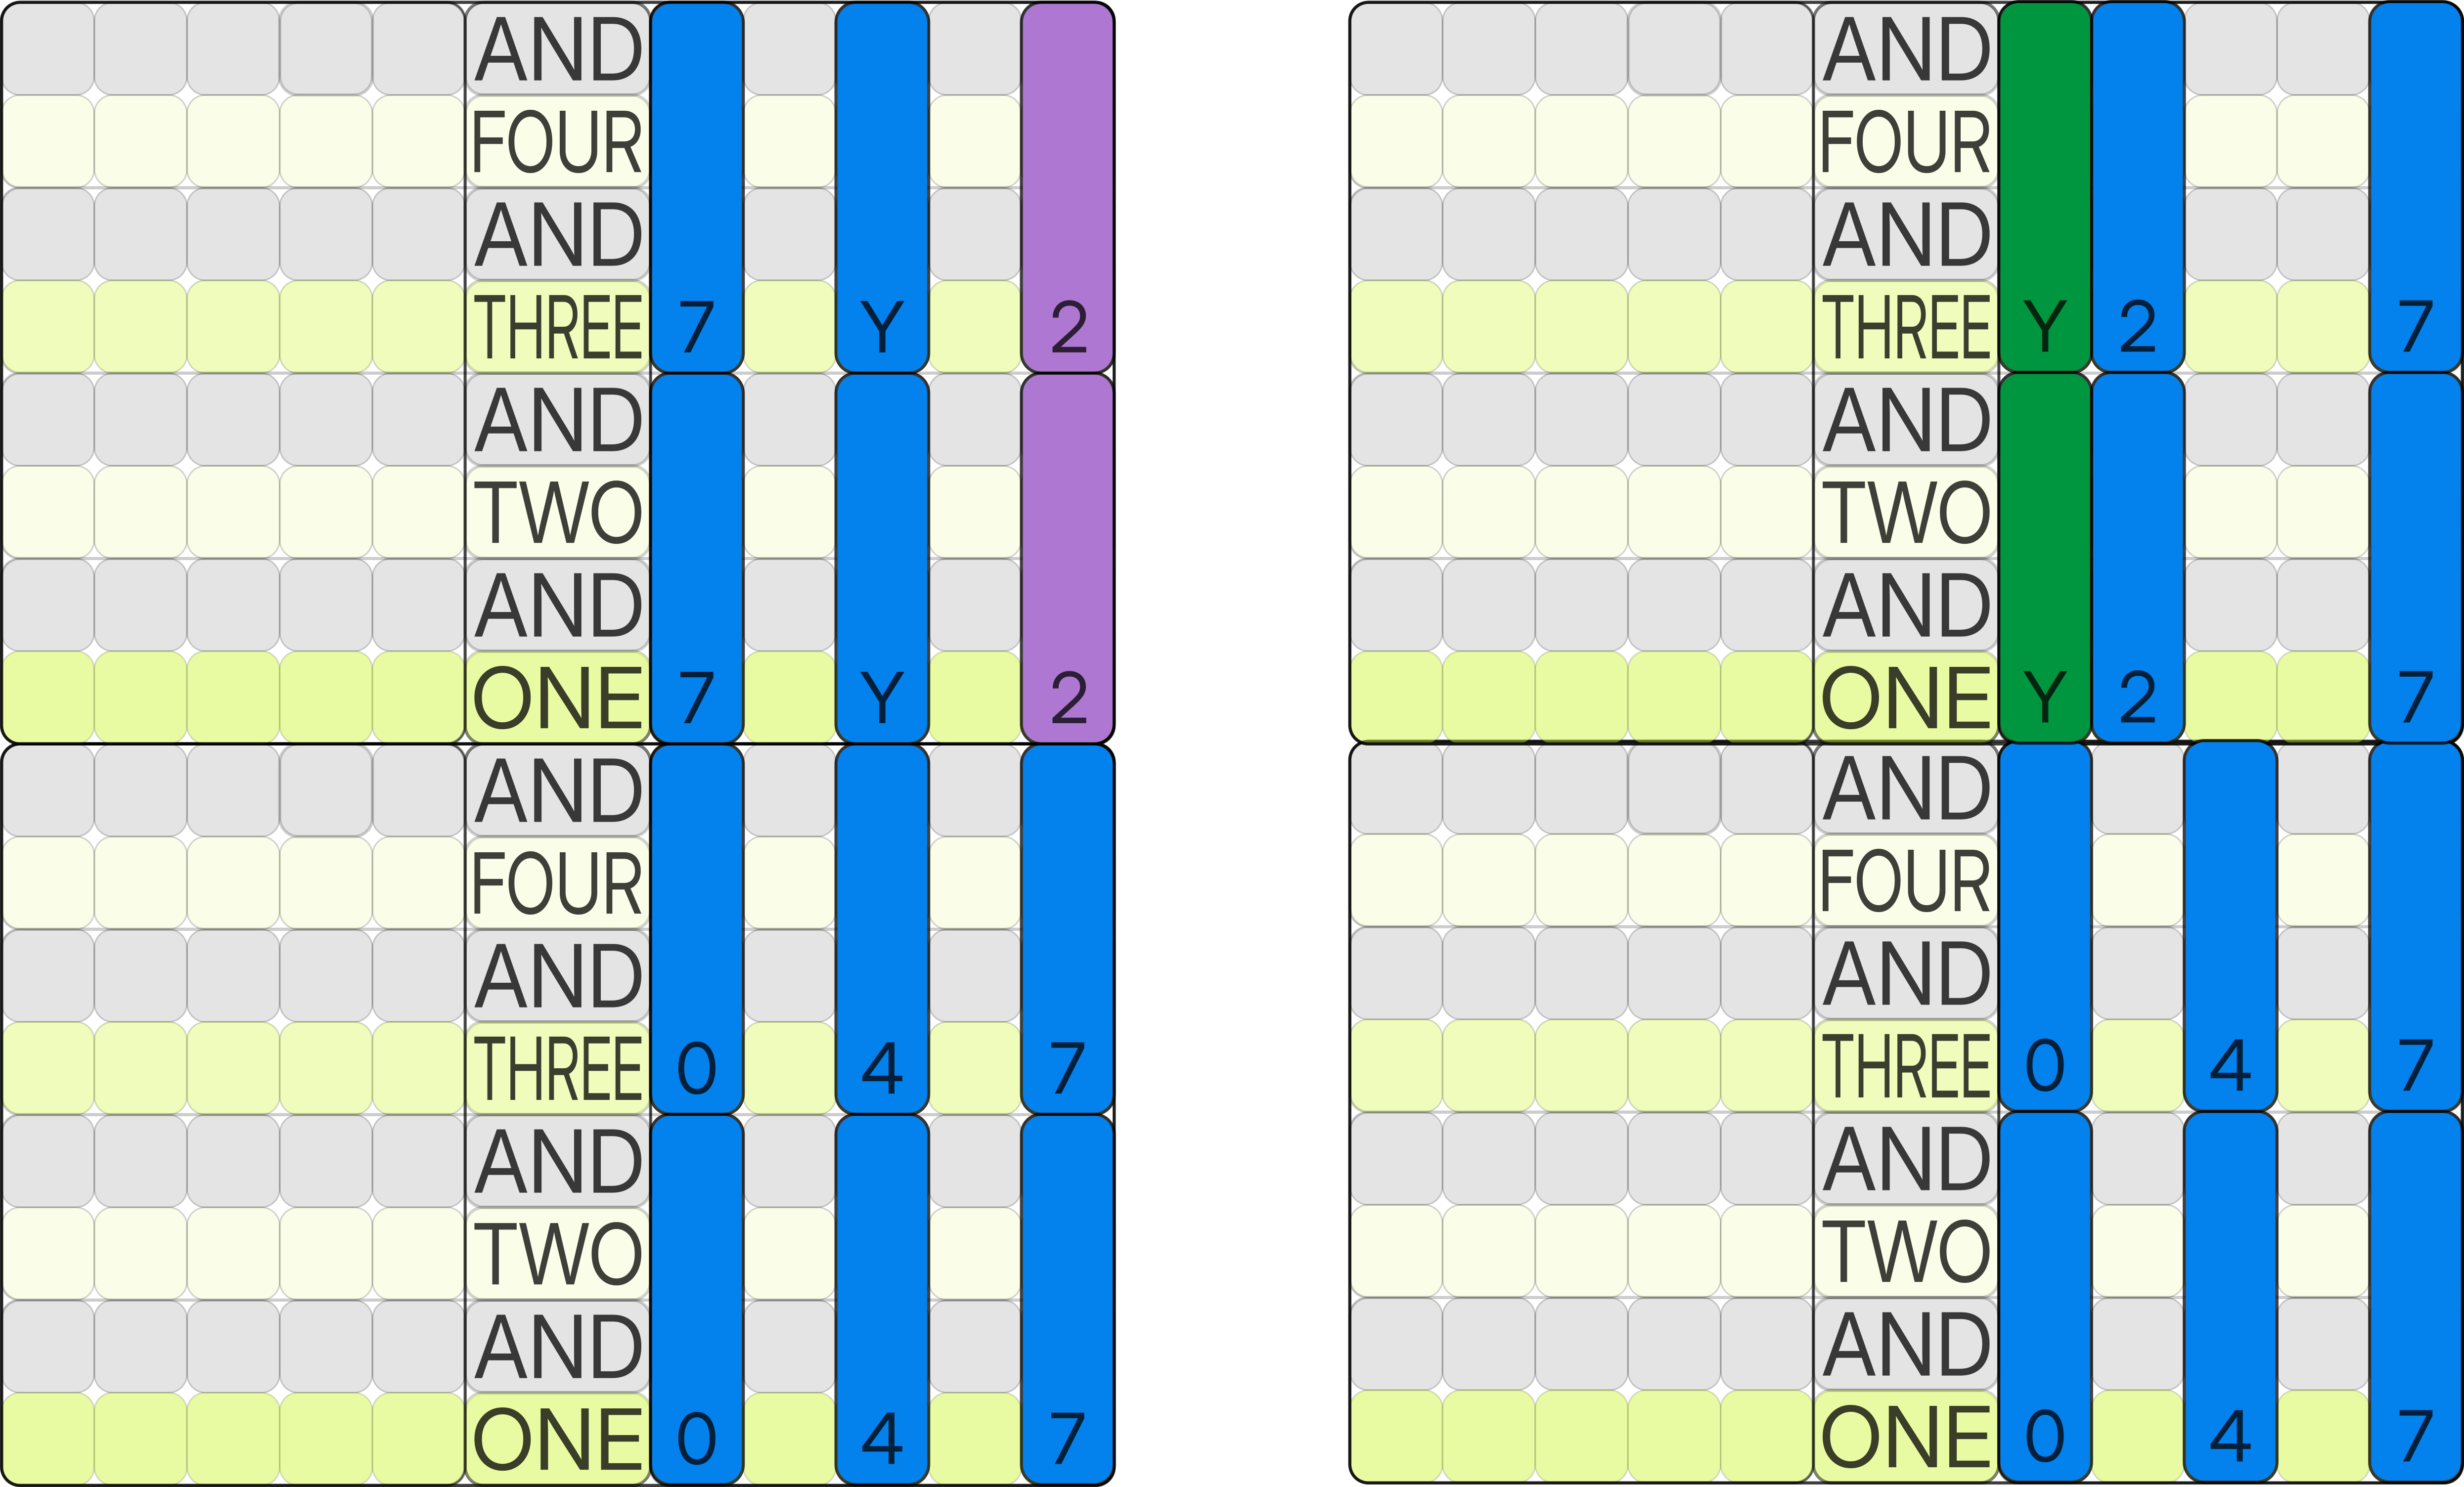
Take chord [7]47 as an example. It consists of keys 7 Y 2. These keys can be played in different orders:
Y 2 7
2 7 Y
7 Y 2
The ability to change the order of keys lets you manage the transition between chords. You can choose the order that:
minimizes hand movement
reduces mistakes
allows you to play faster
decreases tension
Consider the transition [0]47 → [7]47.
Play both variations.
In the first case:
you need to move your whole hand by +7
there is a large gap between chords
the movement is abrupt
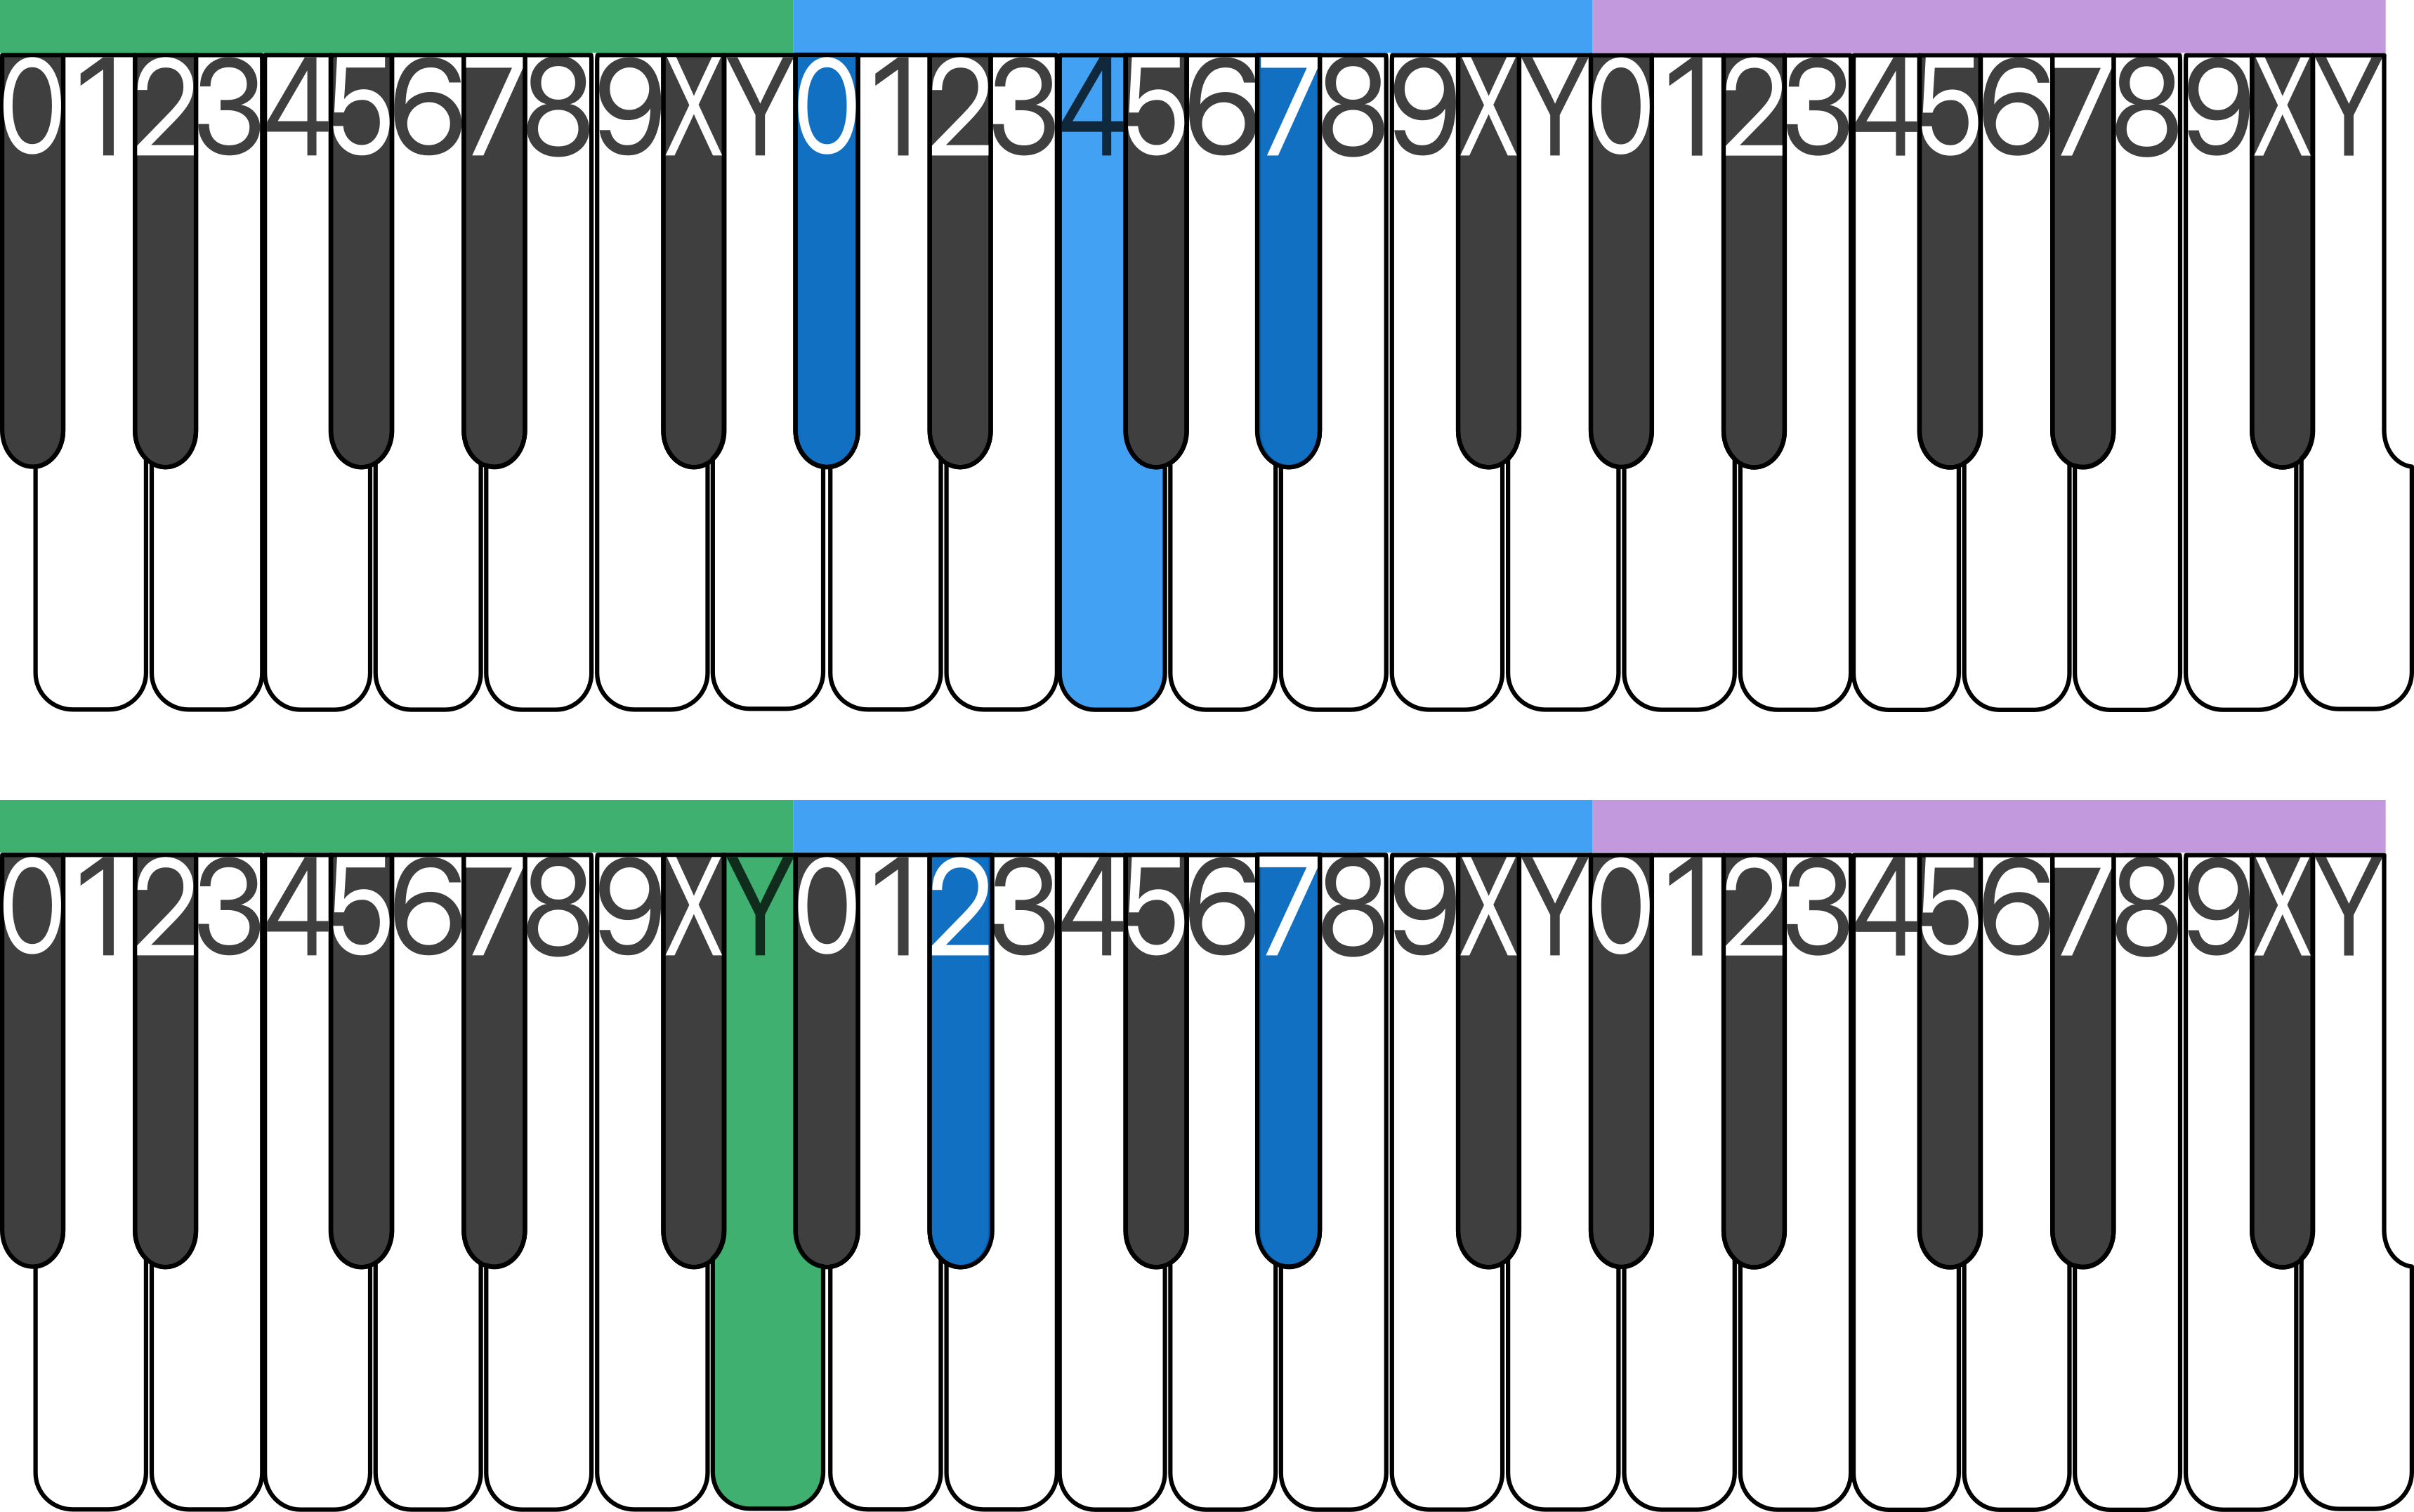
In the second transition:
the hand barely moves
the largest movement is only 2 steps
the transition becomes smooth
Compare these two options and choose the one that is easier for you to play consecutively without stopping.
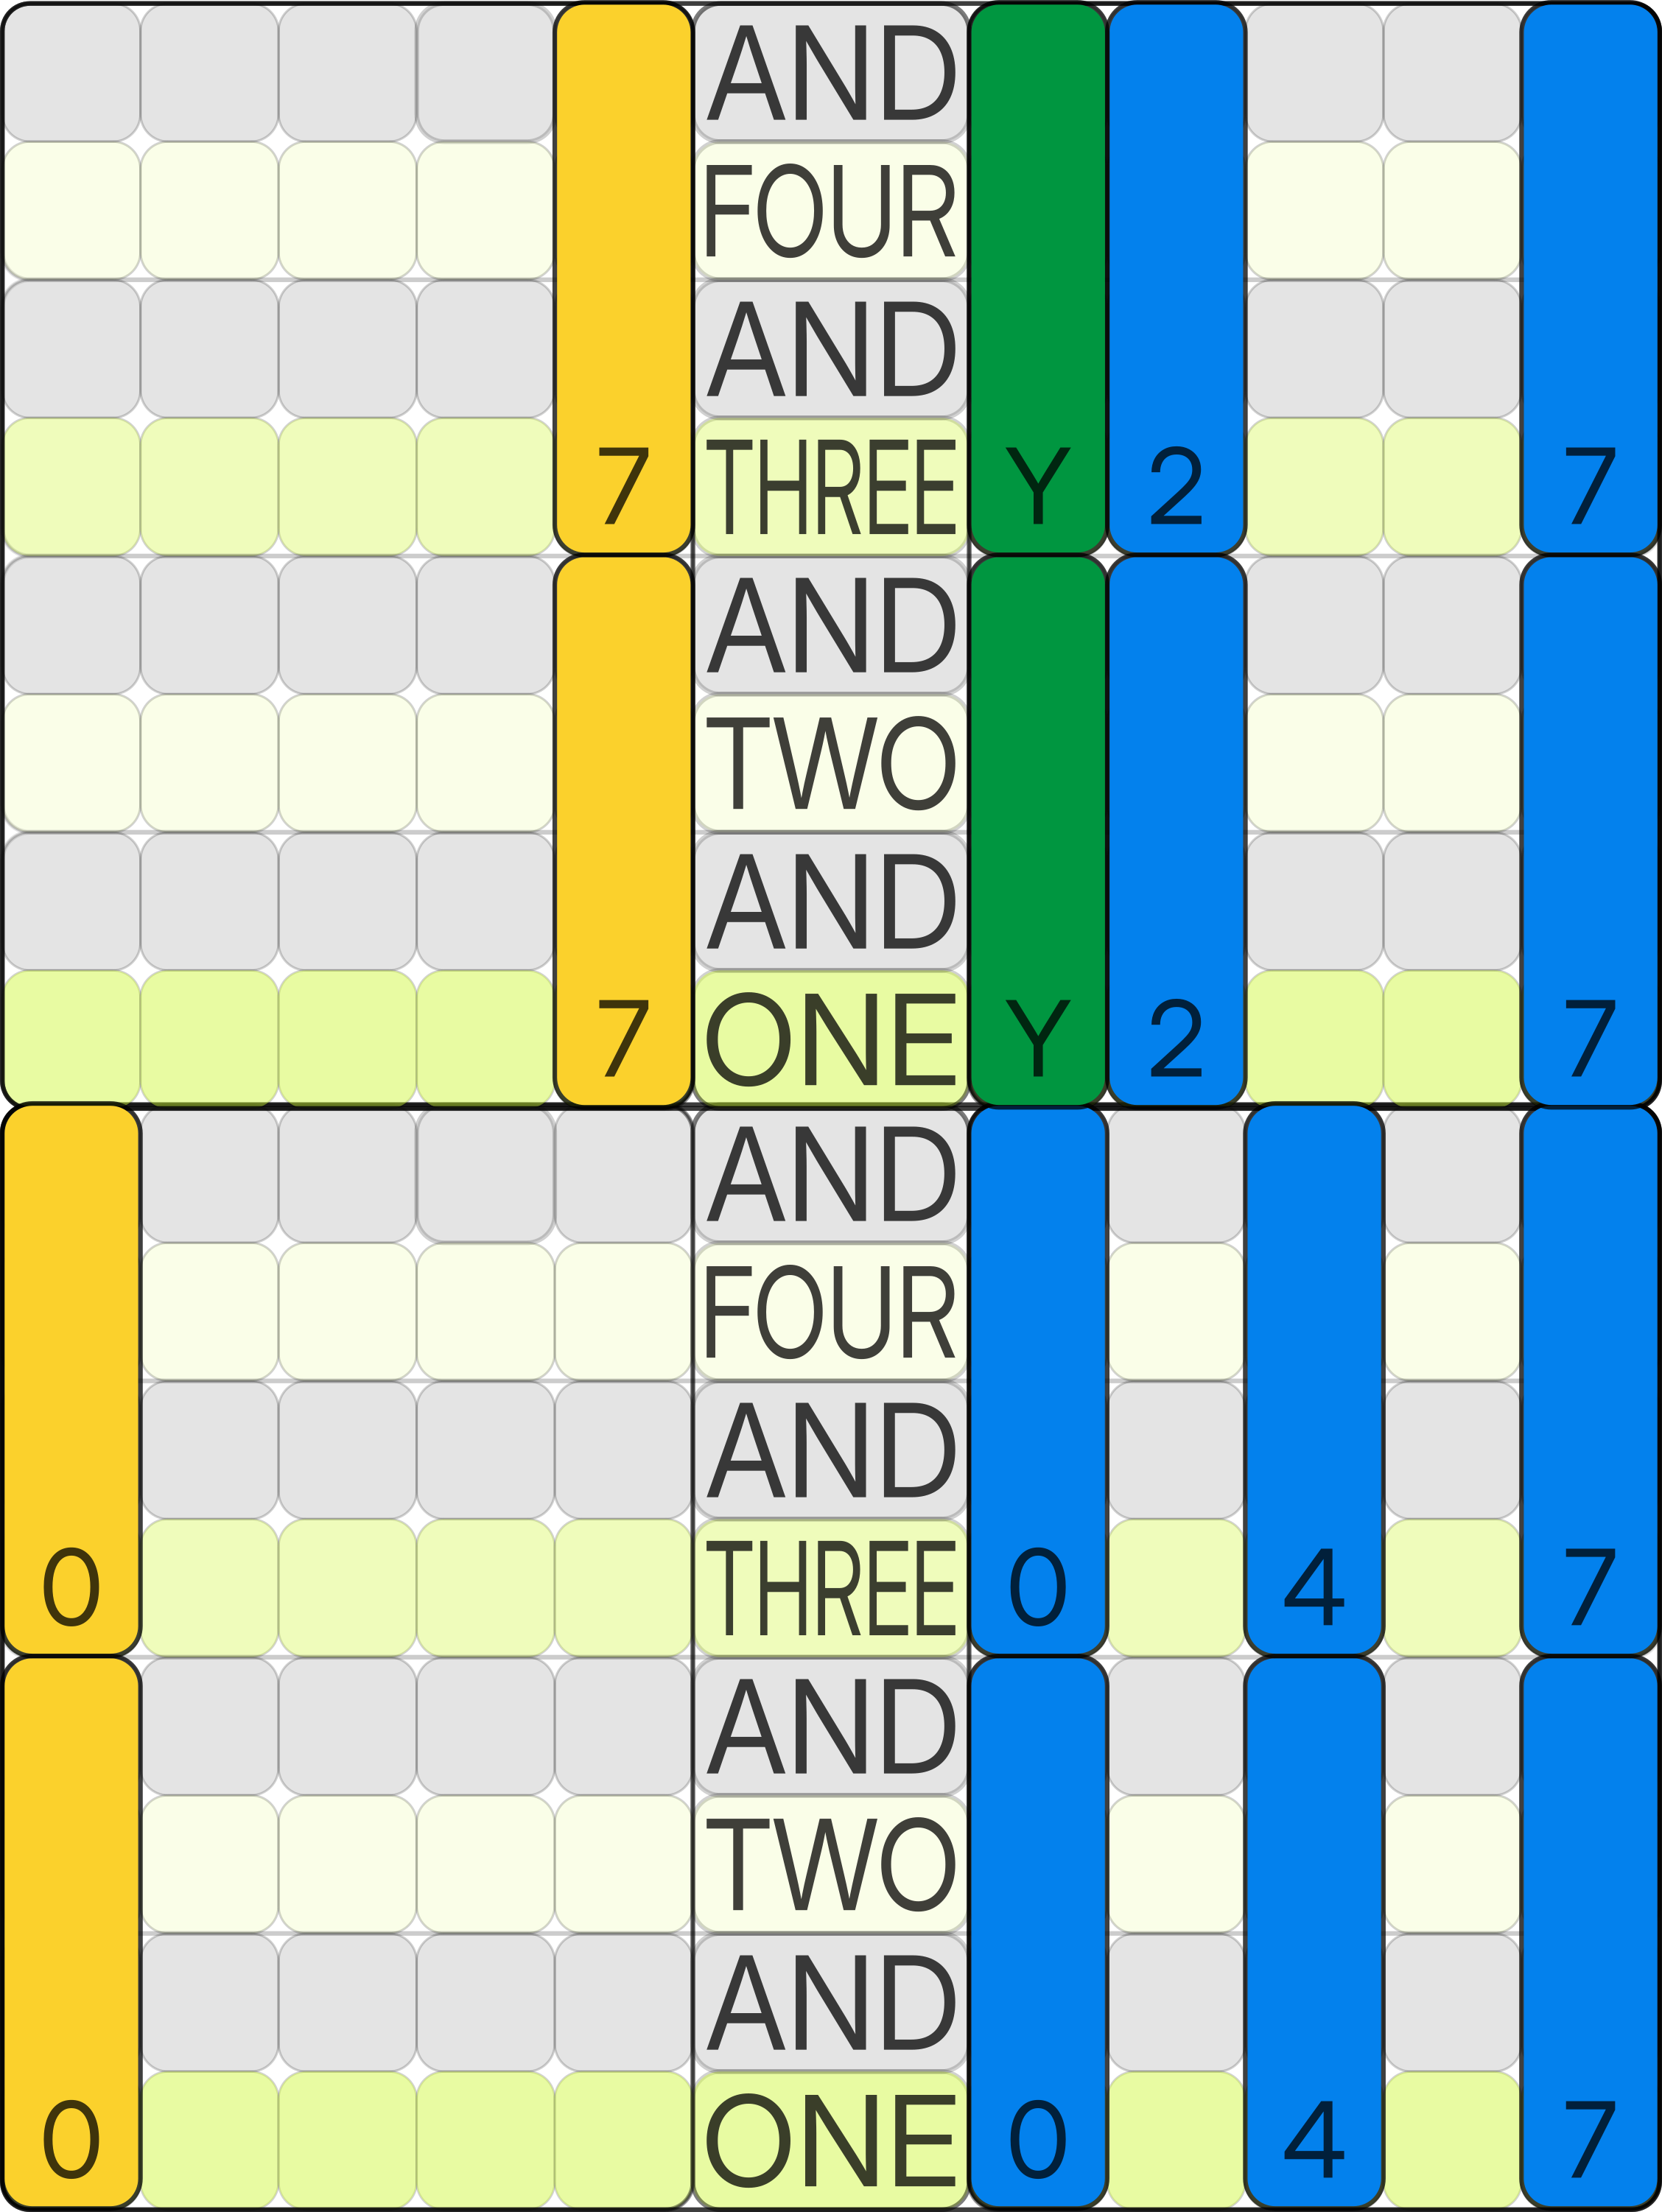
Tip:
While you are still mastering this skill, you can use a visual guide: [7]47.
The color highlights the Distance from the key from which it is convenient to start the chord. If all the symbols are the same color — build the chord from the Starting Key.
And this is how your favorite chords look:
[0]47 → [7]47 → [9]37 → [5]47
In the song Let It Be by The Beatles:
[0]47 [7]47 [9]37
When I find myself in times of trouble
[5]47
Mother Mary comes to me
In most cases, chords are played with the right hand, and the left hand plays the bass. If the bass is not specified separately, the left hand plays the same keys as the Starting Key, but one Cycle lower.
Example:
If chord Starting Keys are [0] and [7], the bass is also keys 0 and 7, one Cycle lower.
Sometimes the bass differs from the Starting Key.
In this case, the bass is indicated separately:
(Y)[7]47
And in the song You’re Beautiful by James Blunt:
Instrumental: [0]47 | (Y)[7]57 | [9]37X | [5]47 [5]247*
*Horizontal lines show chord duration. Details in Block 3.
[0]47
My life is brilliant,
(Y)[7]257
My love is pure.
[9]37X
I saw an angel,
[5]47 [5]247
Of that I’m sure.
Once you master chords, you will stop “repeating music” and start controlling it. The same song will no longer sound exactly the same. You can play it gently or sharply, simply or richly, calmly or with tension. Music stops being a fixed recording — it becomes material that you work with. You will develop “favorite” Starting Keys — the keys that are easier to sing from or to build complex chords. Later, many chord sequences will start memorizing themselves, and a special “vision” will appear — you will start to anticipate the next chord and feel its direction.
Chords are not about memorization. They are about freedom of choice: which keys to play, in what order, how to transition to the next chord, where to simplify, and where to enhance the sound — this is where your style emerges.
But this does not happen immediately.
It is the result of practice. Many repetitions. A lot of repetitions. Behind every confident performance are countless mistakes and even more attempts.
Each time you play chords:
the hand starts memorizing convenient options
movements become more confident
transitions become more accurate
the sound becomes more connected
You gradually stop thinking about the keys and start hearing the result.
At first, a simple tool will help you — the chord table.
You can print it or open it on your phone.
Chord Table
Block 3. Rhythm
Introduction
Music = Key Combinations + Rhythm.
Rhythm is the way you manage time in music. It is how you use Key Combinations:
when you press them
how long you hold them
when you release them
and where you leave silence
In this Block, you will:
learn what Pulse is
learn different ways to Count it
discover how to divide the Count into Steps
understand how accents work
learn Count Division into 2 and 3 Steps
It will not be easy.
There will be many new concepts, and at first some of them may seem similar to one another.
Rhythm is something you need not only to understand, but also to feel.
Rhythm is learned through practice: through counting, movement, repetition, repetition, and repetition.
To do that, follow four rules:
Count Out Loud
Counting out loud gives you control over time and helps you feel rhythm accurately.
It is not a sign of inexperience. It is a professional tool.
Make the Complex Simple
Break complex movements and rhythms into short, understandable actions.
Start Slowly
First accurate, then fast.
A slow tempo helps you feel and remember the correct movements.
Use a Metronome
A metronome provides a steady Pulse and helps you maintain a consistent tempo without speeding up or slowing down.
Let's begin.
Chapter 9. Pulse
Pulse is a steady sequence of repeating beats. First, just listen to the Pulse — turn on a metronome.
(https://share.google/qHpI2K7FYoDgGxjrx)
A metronome is a tool that produces a steady Pulse at a selected tempo. The speed of the Pulse is called the tempo of the music. It is measured in BPM (Beats Per Minute).
BPM = 60 means 60 beats per minute — one beat per second.
BPM = 120 means two beats per second.
The higher the BPM, the faster the tempo.
Set the metronome to BPM = 60.
Clap on every metronome click and count out loud:
ONE
ONE
ONE
ONE
Repeat the exercise at BPM = 90 and BPM = 120. Practice for 1 minute at each BPM.
Now look at how Pulse can be represented. Imagine time as a straight line and the metronome clicks as points placed on that line.
At 60 BPM, the metronome produces one click per second. At 120 BPM, it produces two.
But Pulse is not only something you hear and see — you need to feel it in your body.
Feeling Pulse is a natural human ability. The brain automatically recognizes rhythm, begins to predict it, and starts waiting for the next beat.
Think about how your fingers naturally start moving in time with the click of a turn signal. Or how your steps gradually sync with your favorite song during a walk or a run. Your body does this automatically.
Set to BPM = 60.
Walk around the room, or simply march in place.
First, spend one minute taking one step on every metronome click.
Then speed up and take two steps on every click.
Continue for at least one minute.
After a while, your body will begin to lock into the Pulse automatically.
Being able to hear, see, and feel the Pulse is necessary before you can learn to Count it.
So where should Counting begin? Of course — with ONE.
Chapter 10. Count
You can hear, see, and feel the Pulse. Now you will learn how to Count it.
Pulse is a series of identical beats occurring at equal intervals of time.
But Pulse can be counted in different ways: by grouping beats into small repeating patterns. In Play12, these patterns are called Rounds.
Let's begin with the simplest option — a Round of two beats.
Turn on the metronome.
BPM = 60
Stand up. Count out loud and take a step on every ONE.
Do not step on two.
ONE two
ONE two
ONE two
ONE two

Continue the exercise for 1 minute. Now stop and think: Which beat felt stronger?
Every Round begins with ONE. ONE is a natural accent. The brain highlights the beginning of the Round and helps you keep track of the Count. Just as chords have a Starting Key — the key from which the chord is built — rhythm has ONE as its reference point.
You have just counted the Pulse in Rounds of two beats. This type of Count feels natural: walking, marching, moving forward. It is no coincidence that marching rhythms are built on this Count.
But Pulse can be counted in more than groups of two. Let's try counting the same Pulse in groups of three. Now each Round will contain three beats.
Counting in 3
Turn on the metronome.
BPM = 60
Stand up. Count out loud.
Take a step on every ONE. Do not step on two or three.
ONE two three
ONE two three
ONE two three
ONE two three

Continue for at least 1 minute.
Does it feel different? This Count usually feels less like a march and more fluid. It is no coincidence that many waltzes are built on groups of three.
The most important thing:
The beats are the same.
The Count is different.
The music changes.
Turn on the metronome.
BPM = 60
Count 6 Rounds of TWO, then immediately 4 Rounds of THREE:
ONE two
ONE two
ONE two
ONE two
ONE two
ONE two
ONE two three
ONE two three
ONE two three
ONE two three

Try counting along with real music.
Do not rush.
Listen.
Give yourself time to feel the rhythm.
Counting in groups of 2:
The White Stripes — Seven Nation Army
Miley Cyrus — Flowers
Felix Mendelssohn — Wedding March from A Midsummer Night's Dream
Counting in groups of 3:
R.E.M. — Everybody Hurts
Ed Sheeran — Perfect
Pyotr Tchaikovsky — Waltz of the Flowers
Counting in 2 and 3 is the foundation of rhythm.
Just as you learned two basic chord forms in Block 2 — 37 and 47 — rhythm also has two basic counting forms:
2 and 3
Most rhythms can be built from twos and threes:
4 = 2 + 2
5 = 3 + 2 or 2 + 3
6 = 3 + 3 or 2 + 2 + 2
7 = 3 + 2 + 2 or 2 + 2 + 3
But there is one important detail.
Inside a longer Round, another accent appears. Not as strong as the first ONE. A weaker one. This is what turns simple counting into real rhythm. In the next chapter, you will learn how it works.
Chapter 11. Internal Accents
Turn on "Truly Madly Deeply" by Savage Garden.
It has a comfortable tempo. Let's begin by Counting in 2.
Stand up. Count out loud.
On every ONE, take a step (STOMP).
On every two, clap your hands (CLAP).

Do this through the verse and the chorus. Try to make your STOMP and CLAP line up with the drums. If it feels easy, you can sing along. Now you will Count in 4. This is simply 2 + 2, and you already know how to do that. The only thing being added is one more movement — SLAP, a hand slap on your thigh.
Stand up.
Count out loud.
On every ONE, take a step (STOMP).
On every two, clap your hands (CLAP).
On every THREE, slap your thigh (SLAP).
On every four, clap your hands (CLAP).

Play the rhythm through another verse and chorus. Do not think about the music.
Just move with it:
STOMP — CLAP — SLAP — CLAP — STOMP — CLAP — SLAP — CLAP
Which beat after ONE feels stronger? Most likely THREE. When Counting in 4, two Counts of 2 fit inside one Round:
ONE two | ONE two
becomes:
ONE two THREE four
ONE remains the main accent of the entire Round. THREE becomes an Internal Accent. It is weaker than ONE, but stronger than two and four.
Internal Accents help you feel longer Rounds and avoid getting lost inside them.
Before you begin Counting in 5, let's define three levels of accents:
Strong — ONE — at the beginning of the Round — STOMP
Medium — inside the Round — SLAP
Weak — a regular beat — CLAP
There are many more accents in music, but for understanding rhythm, these three are enough for now.
Counting in 5
A Count of 5 can be organized in two ways:
3 + 2 or 2 + 3.
Let's begin with 3 + 2.
Turn on the metronome.
BPM = 60
Try to feel the shift from a flowing group of three to a straight group of two.
Stand up.Count out loud.
On every ONE — Strong — take a step (STOMP).
On every two — Weak — clap your hands (CLAP).
On every three — Weak — clap your hands (CLAP).
On every FOUR — Medium — slap your thigh (SLAP).
On every five — Weak — clap your hands (CLAP).
STOMP — CLAP — CLAP — SLAP — CLAP

Count like this for 2 minutes. Do not rush. Make sure your body remembers the rhythm. This is 3 + 2. Waltz + March.
Turn on "Take Five" by The Dave Brubeck Quartet. Listen to this Count of 5. Try Counting 3 + 2. It may not work right away. The instruments can distract you. That happens. With practice, the ability to Count over music will come.
But a Count of 5 can also be organized differently:
2 + 3
March + Waltz
Turn on the metronome.
BPM = 60
Stand up. Count out loud.
On every ONE — Strong — take a step (STOMP).
On every two — Weak — clap your hands (CLAP).
On every THREE — Medium — slap your thigh (SLAP).
On every four — Weak — clap your hands (CLAP).
On every five — Weak — clap your hands (CLAP).

Count like this for 2 minutes. See? It can be done. Listen to "Main Title Theme" (Mission: Impossible) by Artie Kane / Danny Elfman. This music uses a 2 + 3 Count — March + Waltz. Try Counting along with the music.
Now turn on the metronome.
Count several Rounds of 3 + 2, then several Rounds of 2 + 3:
ONE two three FOUR five
ONE two THREE four five
ONE two three FOUR five
ONE two THREE four five
Your main goal is to feel how the character of the rhythm changes when the Internal Accent moves. The number of beats stays the same. Only the position of the SLAP changes. And when it changes, the character of the movement changes with it.
You can Count in 6, 7, 8, 9, and beyond. The principles remain the same as in Counts of 4 and 5. Large Rounds are built from groups of 2 and 3.
Internal Accents divide them into smaller, easier-to-feel sections.
To understand the structure of a rhythm, find the main ONE and the Internal Accents.
A Count can be assembled in different ways.
For example:
8 = 2 + 2 + 2 + 2
8 = 3 + 3 + 2
8 = 2 + 3 + 3
8 = 3 + 2 + 3
The main principle:
1. Find the main ONE.
2. Find the Internal Accents. They show you how the rhythm is organized.
In Play12 notation, the color intensity of a Step and its border will indicate an Internal Accent.

Rhythm is not just the number of beats.The same beats can be organized in different ways. The position of Internal Accents is what creates the character of musical movement.
The next step is to learn how to divide each Count into smaller parts — Steps.
Chapter 12. Count Division
From Chapter 3, you already know that a note does not have to begin and end together with the Count.
It can be shorter than a Count (1).
It can last longer than a Count (2).
And it can begin between Counts (3).
To locate such positions precisely, each Count is divided into Steps. You have already encountered the simplest form of this Division:
ONE AND
TWO AND
THREE AND
FOUR AND
Here, the Count number represents the first Step, and AND represents the second.
Turn on the metronome.
BPM = 60
Count in 6. Count out loud.
On every metronome click, say the Count number.
Between the clicks, say AND.
ONE AND
two AND
three AND
FOUR AND
five AND
six AND
Count for 30 seconds. Now add thigh slaps on every Count and every AND. Count for another 30 seconds.
Has the Pulse changed?
No. The Pulse remains the same. We have simply divided each Count into two Steps.
A Count can be divided not only into two Steps, but also into three.
In that case, the Steps are counted like this:
ONE AND A
TWO AND A
THREE AND A
FOUR AND A
Let's try it.
BPM = 60
Count in 6. Count out loud.
On every metronome click, say the Count number.
Between the clicks, say AND and A.
ONE AND A
two AND A
three AND A
FOUR AND A
five AND A
six AND A
Count for 30 seconds. Now add thigh slaps on every Step:
ONE, AND, and A.
Count for another 30 seconds.
The Pulse is still the same. We have simply divided each Count into three Steps instead of two. But the feeling is different. Describe that difference out loud to yourself. Notice it. Remember it.
Dividing a Count into three Steps is often used when the overall rhythm remains steady and straight. Because of this, an interesting situation can appear in music: one hand plays an even division into 2, while the other plays a flowing division into 3. This is more difficult than simply counting out loud. Do not worry if it does not work right away. This feeling takes time, attention, and many repetitions.
For now, simply practice switching between the two types of Division while following the metronome:
ONE AND
TWO AND
THREE AND
FOUR AND
ONE AND A
TWO AND A
THREE AND A
FOUR AND A
Dividing the Count into 2 and 3 Steps takes time and practice.
Do not worry if it feels slow at first, or if nothing seems to work at all.
Play12 Practice contains plenty of exercises for developing this skill.
The more confidently you feel the Steps inside the Count, the easier it becomes to play complex and subdivided rhythms.
In Play12 notation, you can easily recognize a Division into 3.
Below is a fragment from Piano Man.
Here, a Count of 4 changes to a Count of 3 (1). There are places where one Count is divided into three equal parts and each note occupies one part (2). There are also places where one note occupies two parts of the Count, while the next note occupies only one (3). These and similar patterns are explained in detail and practiced repeatedly in Play12 Practice.
This is a complex rhythm and a memorable introduction. But by now, you already know everything you need to read it. You can Count in 3 and 4.
You understand which keys to press, when to press them, and how long to hold them. You know how to use AND and A to divide the Count and determine the position of notes within it. Now all that remains is practice. Count out loud. Play slowly. Gradually increase the tempo. You already have everything you need to master this passage.
WHAT'S NEXT?
Play12 Manual Basic
Congratulations. You have completed the entire Play12 Manual Basic.
Right now, it may feel like you still know very little. And that's normal.
But let's take a look at what you already have.
✅ You know all 12 notes of the musical Cycle.
✅ You can find them on the keyboard.
✅ You understand how notes are written in Play12 notation.
✅ You can build Distances and Chords.
✅ You can Count Pulse using different Counts and accents.
✅ You can divide Counts into Steps and read complex rhythmic patterns.
That is already far more than most people know when they only dream about learning to play. But the most important thing is this: Music is no longer a collection of mysterious symbols. Now you understand its logic. It has become a system that can be learned step by step.
Welcome to the most important part of learning:
Practice.
You cannot learn music by reading, understanding, or listening.
You can learn music only by playing.
☐ Play every day.
Even 10–15 minutes of regular practice is more valuable than several hours once a week.
☐ Learn songs.
Do not be afraid of difficult pieces.
Every large composition is made of smaller parts.
☐ Count out loud.
☐ Play slowly.
Do not rush to increase the tempo.
Speed comes naturally when your movements become confident.
☐ Return to this material.
Over time, you will begin to notice things that previously escaped your attention.
That is how learning works.
Play12 Practice
Play12 Manual gave you the foundation.
Play12 Practice helps turn knowledge into skill.
It contains exercises for developing technique, rhythm, hand coordination, and confident reading of Play12 notation. Follow the instructions carefully, and everything will work out.
This is where theory becomes practice.
Play12 Practice →Play12 Manual Intermediate
Once your basic skills become confident, you can move on.
In Play12 Manual Intermediate, you will discover new chords and the logic behind chord progressions, more advanced rhythms, additional accompaniment techniques, and musical ideas that appear constantly in modern music.
But do not rush. Right now, the most important thing is to start playing.
Take the first step.
Then the second.
Then another.
And one day, you will realize that you are playing the music you once only dreamed about playing.
Play12 Manual Intermediate →
See you in Play12 Practice.
Your friend,
Roman Reshetnyak